
Google In-App Purchase Subscription
With a Google In-App Purchase Subscription, app owners can make money from their apps. Users can download your app for free, and then they can make additional purchases in your app by adding subscriptions to a specific Channel, Chat Group or Bot.
Adding subscription to a Channel, Chat Group or Bot
Make sure to install one or more of these modules in your Home or Side Menu in order for them to be shown on your left Admin Menu.
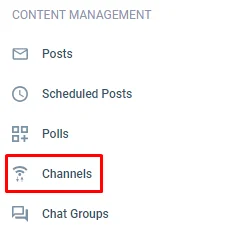
Click 'Channels'.
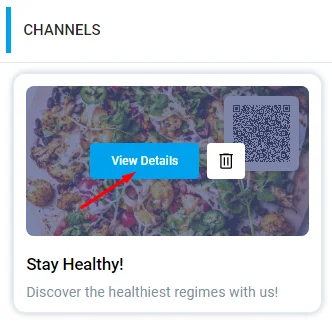
Hover over your channel and click 'View Details' to set up payment.
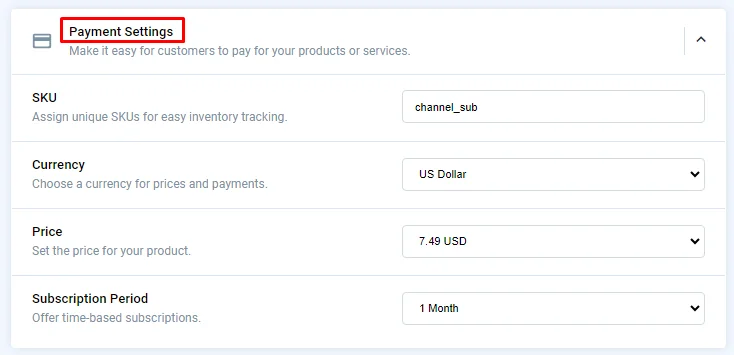
Enter your SKU, choose your currency, choose your subscription period, and add your price.
You can do the same thing with chat groups and bots.
Add subscriptions as Products in the Google Play Console
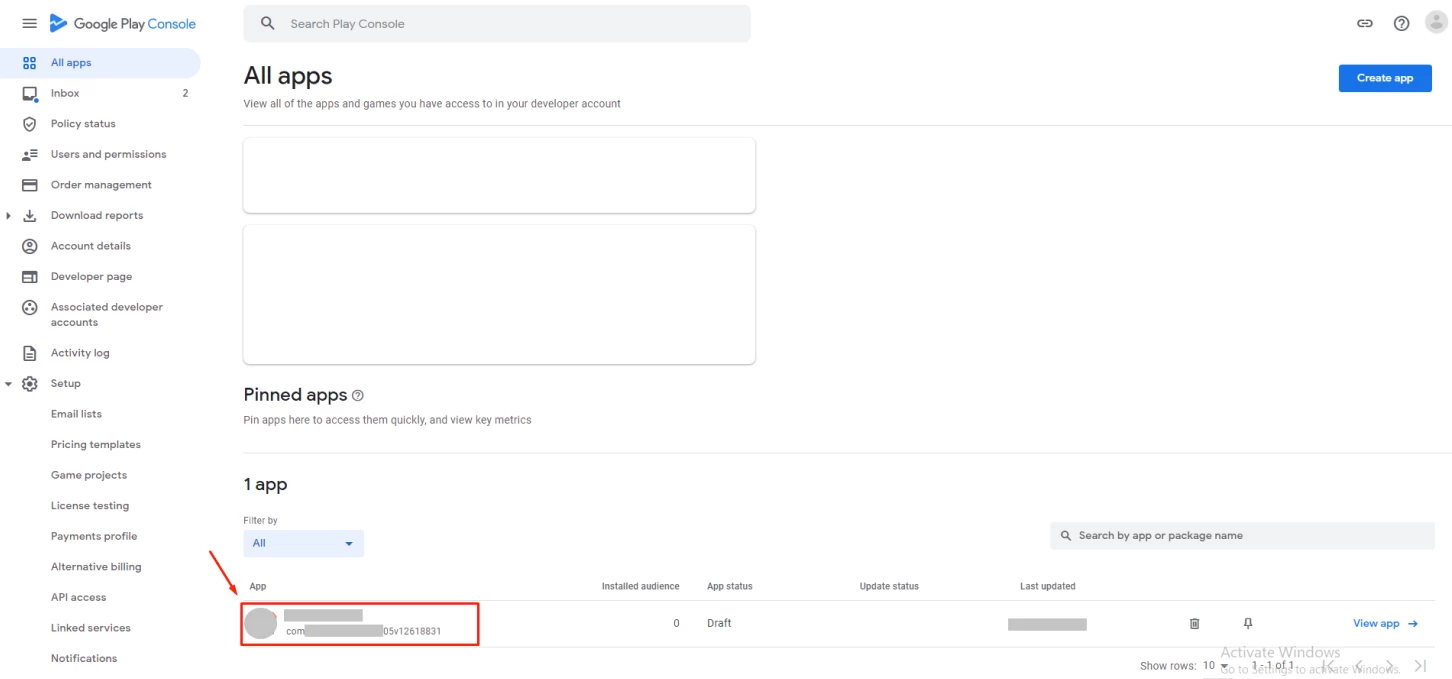
Go to Google Play Console, and select your app.
From the left-hand side menu, scroll down until you reach "Products", Slide the menu down and click "Subscriptions".
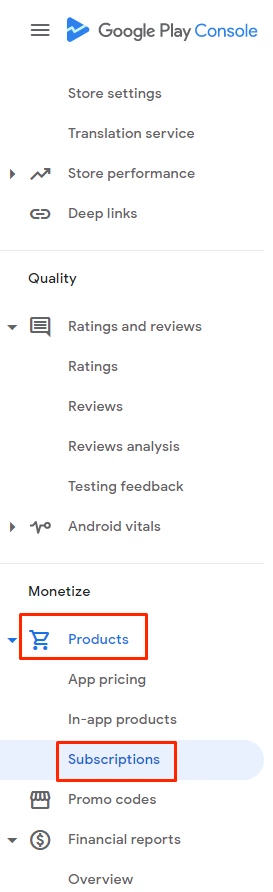
Click "Create Subscription".

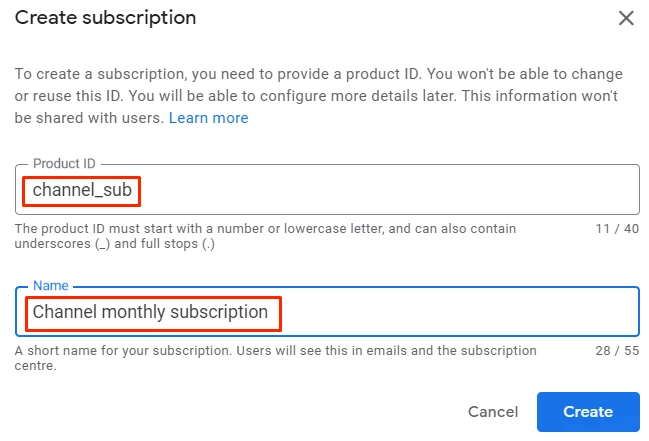
Add product ID: Add channel_sub. Make sure to match it to the SKU you added to your channel. According to Google guides, it Must start with a number or lowercase letter.
- Add Name
- Click "Create"
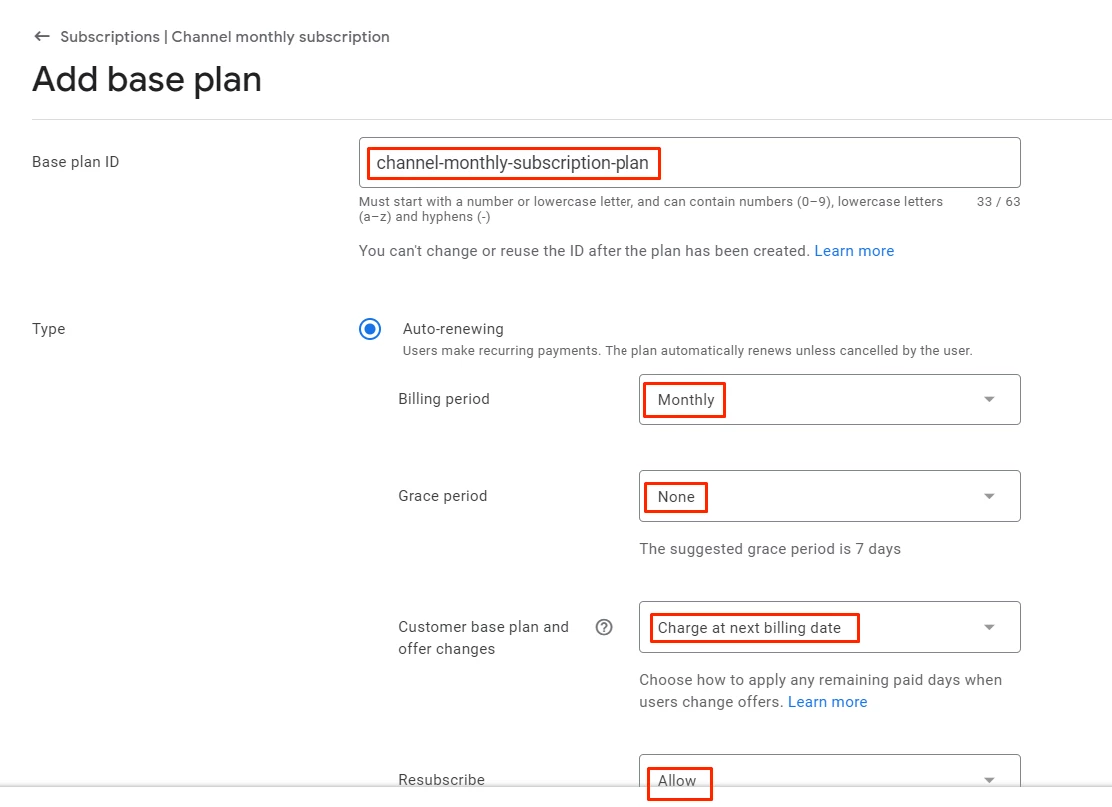
On the same page of the subscription, click "Add Base Plan".
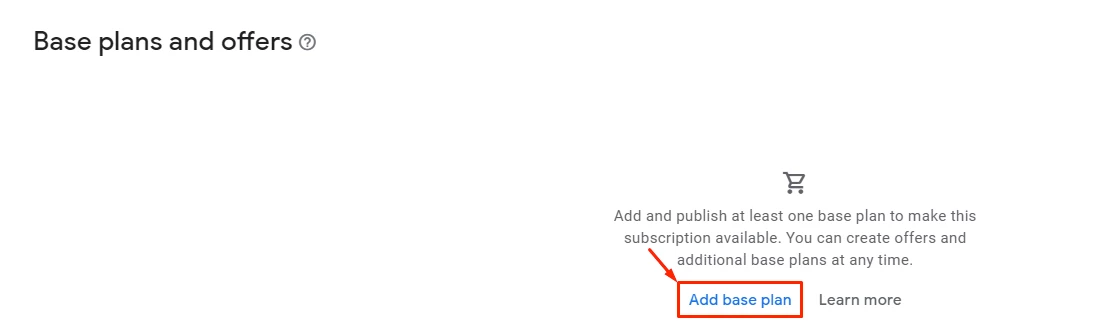
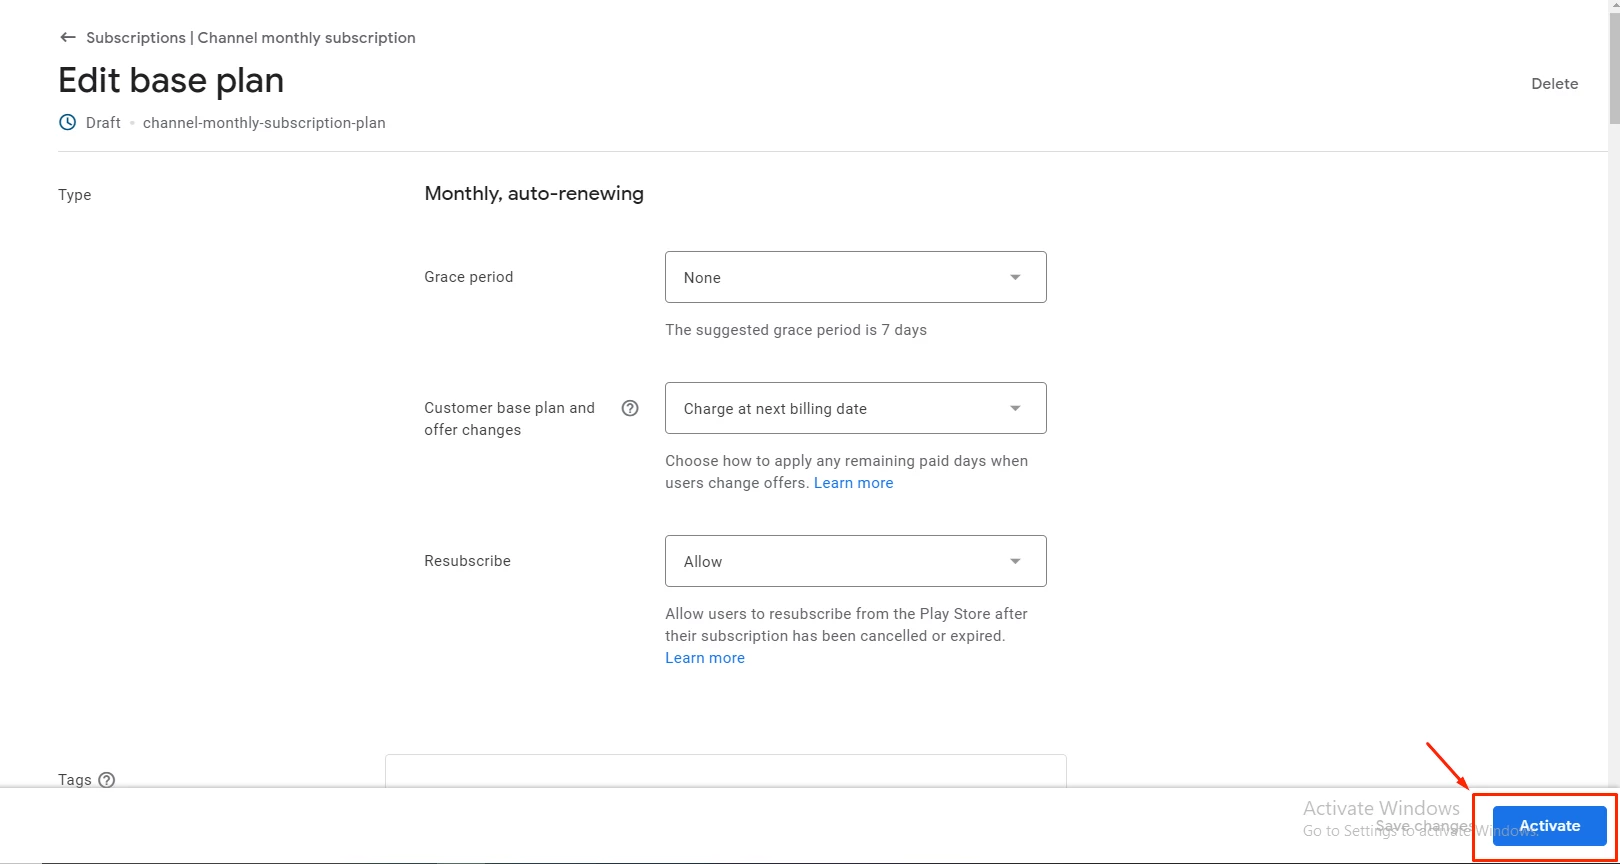
Add Base Plan ID: channel_monthly_subscription_plan
Recommendation: Make the Grace period "None"
- Choose "Charge at next billing date"
- Allow Resubscription
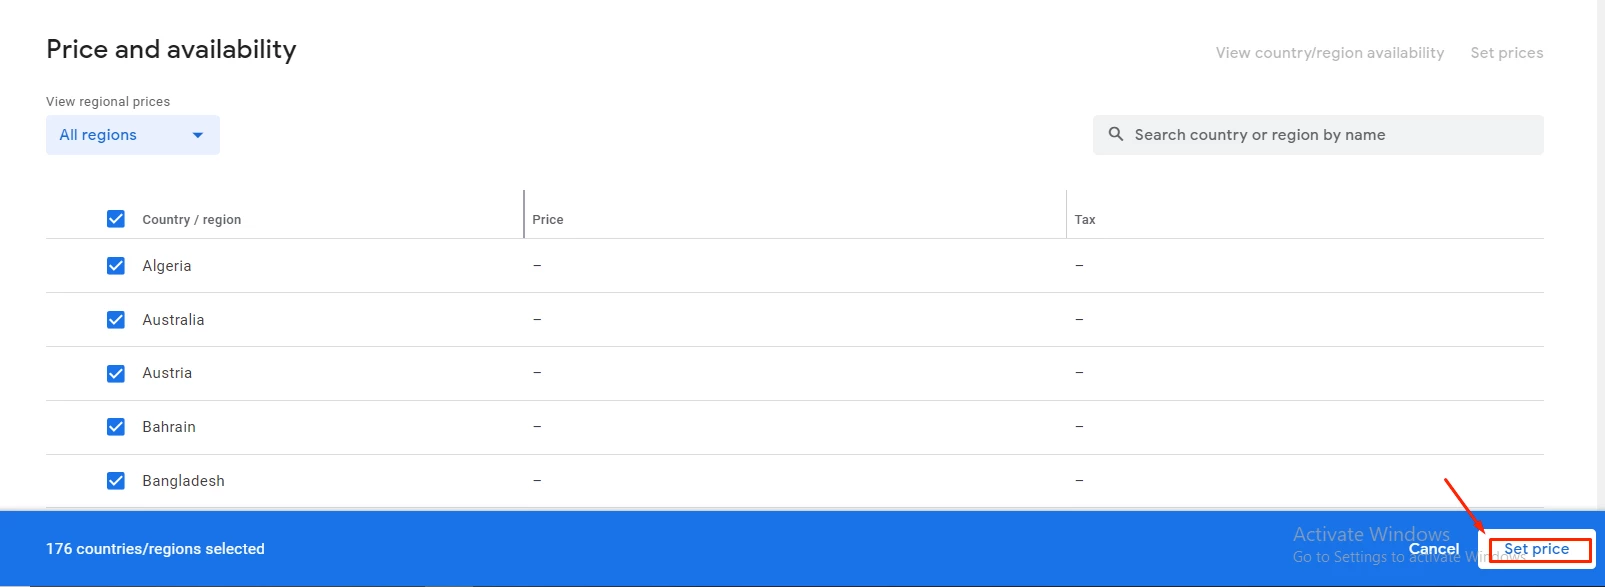
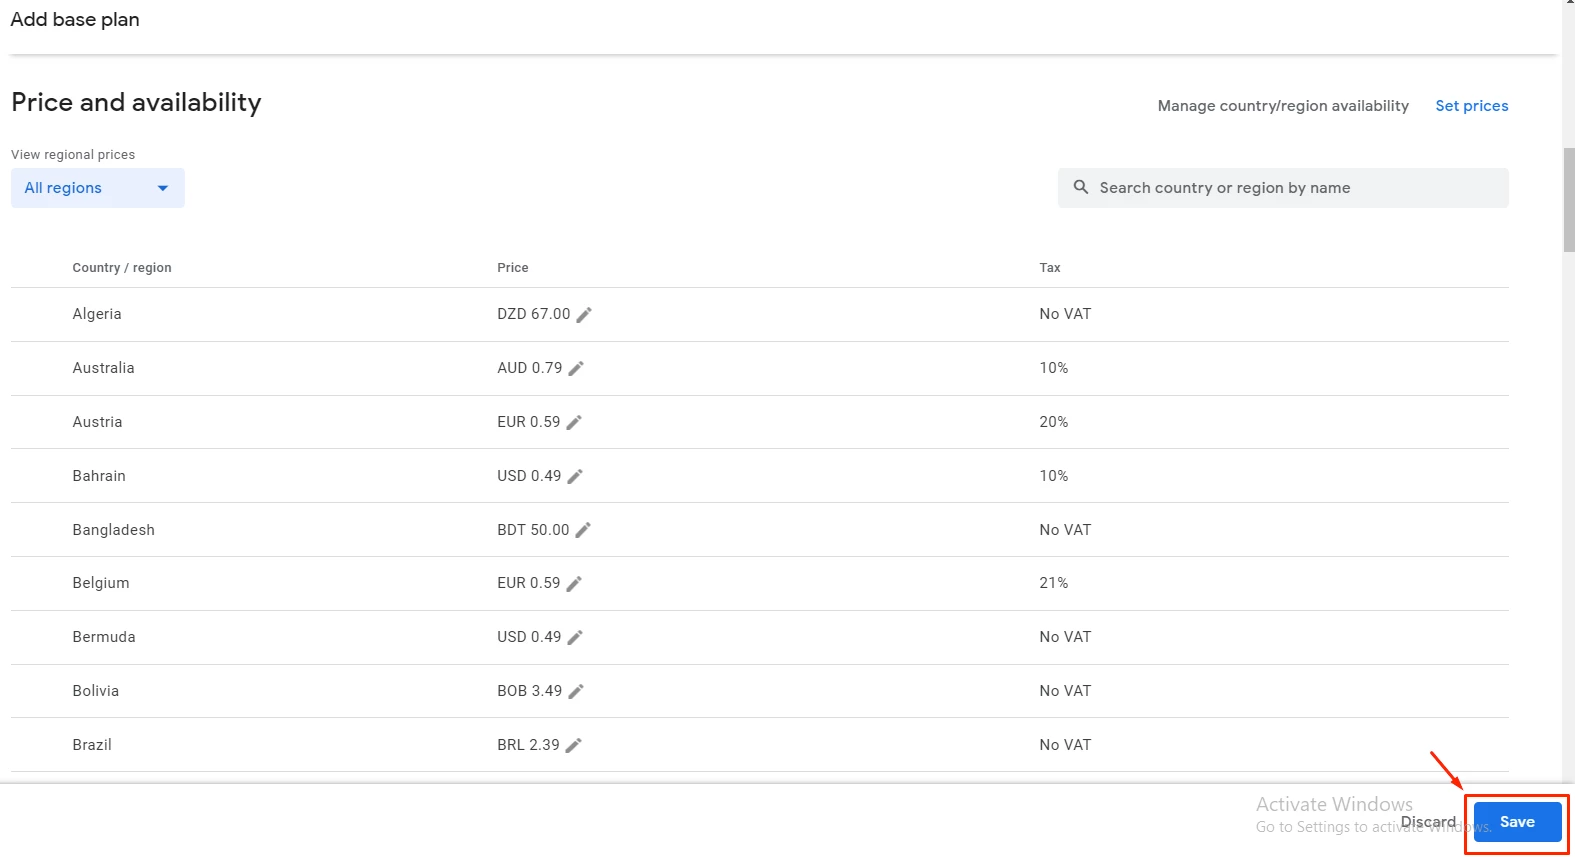
Setup Price and availability:
Set up your price and choose your targeted regions.
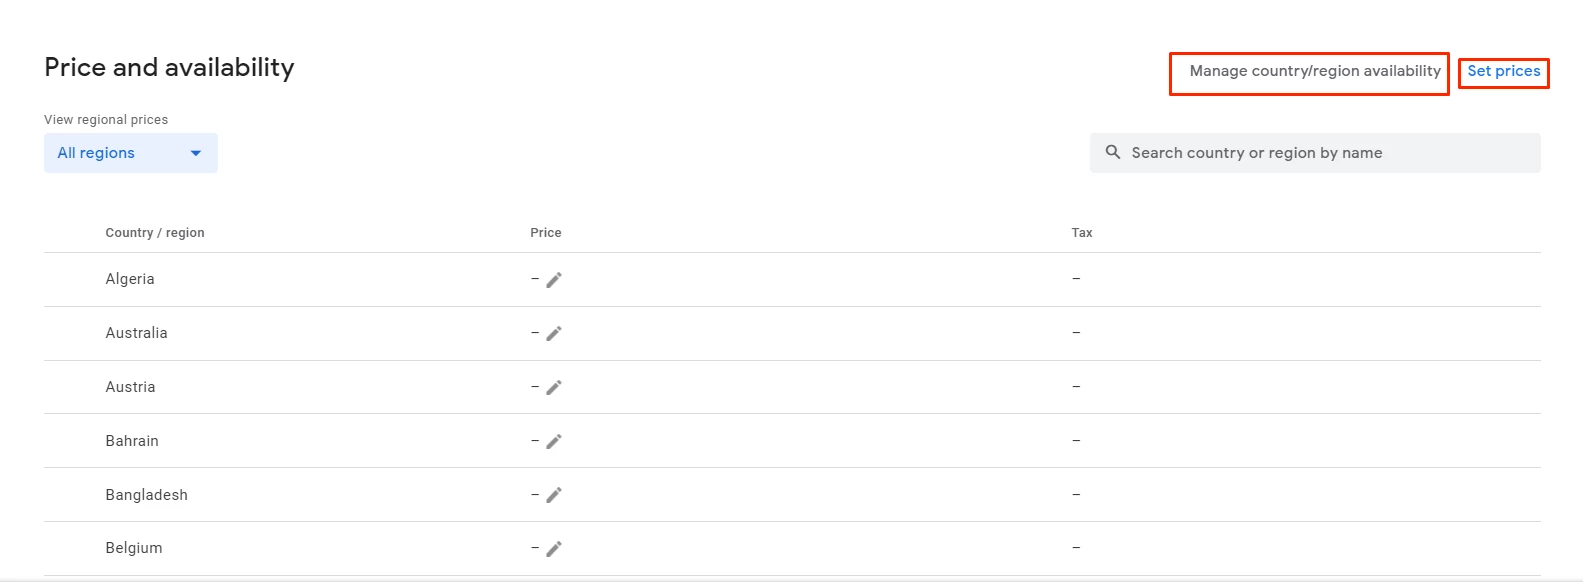
Click "Set price".
Make sure to match the currency setting with the currency you chose in your Channel / Chat Group.
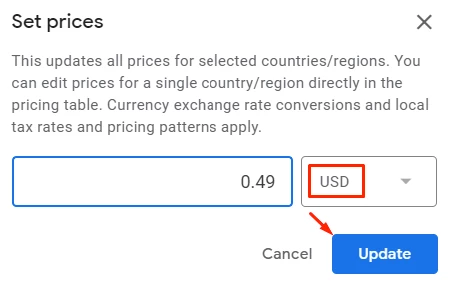
Click "Save".
Then click "Activate".
Here are more details regarding Google's subscription creation.
Linking subscription purchases with nandbox App Builder
After making your subscription, you need to link your account to a Google Developer Project.
Note that these setup steps are for one time only.
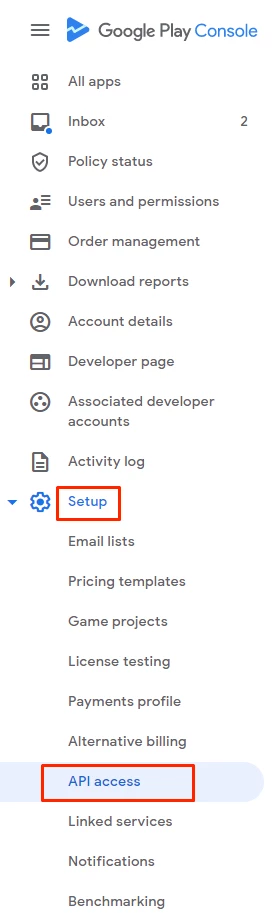
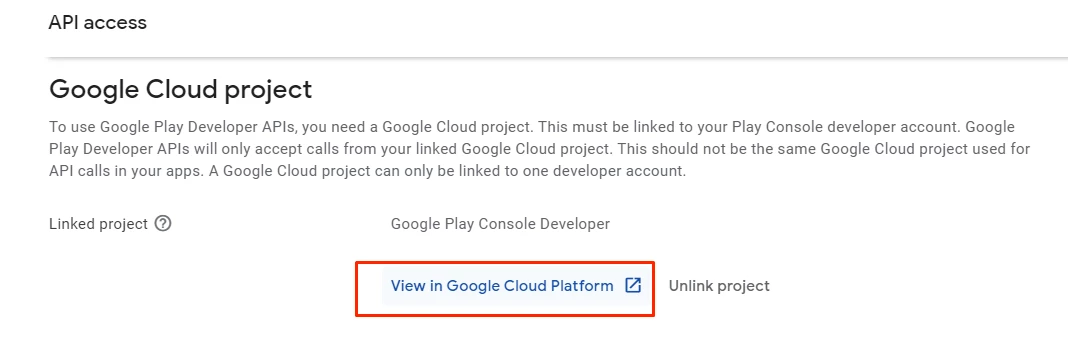
Go to Google Play Console, from the left-hand side menu, scroll down until you reach "Setup", slide the menu down, and click "API access".
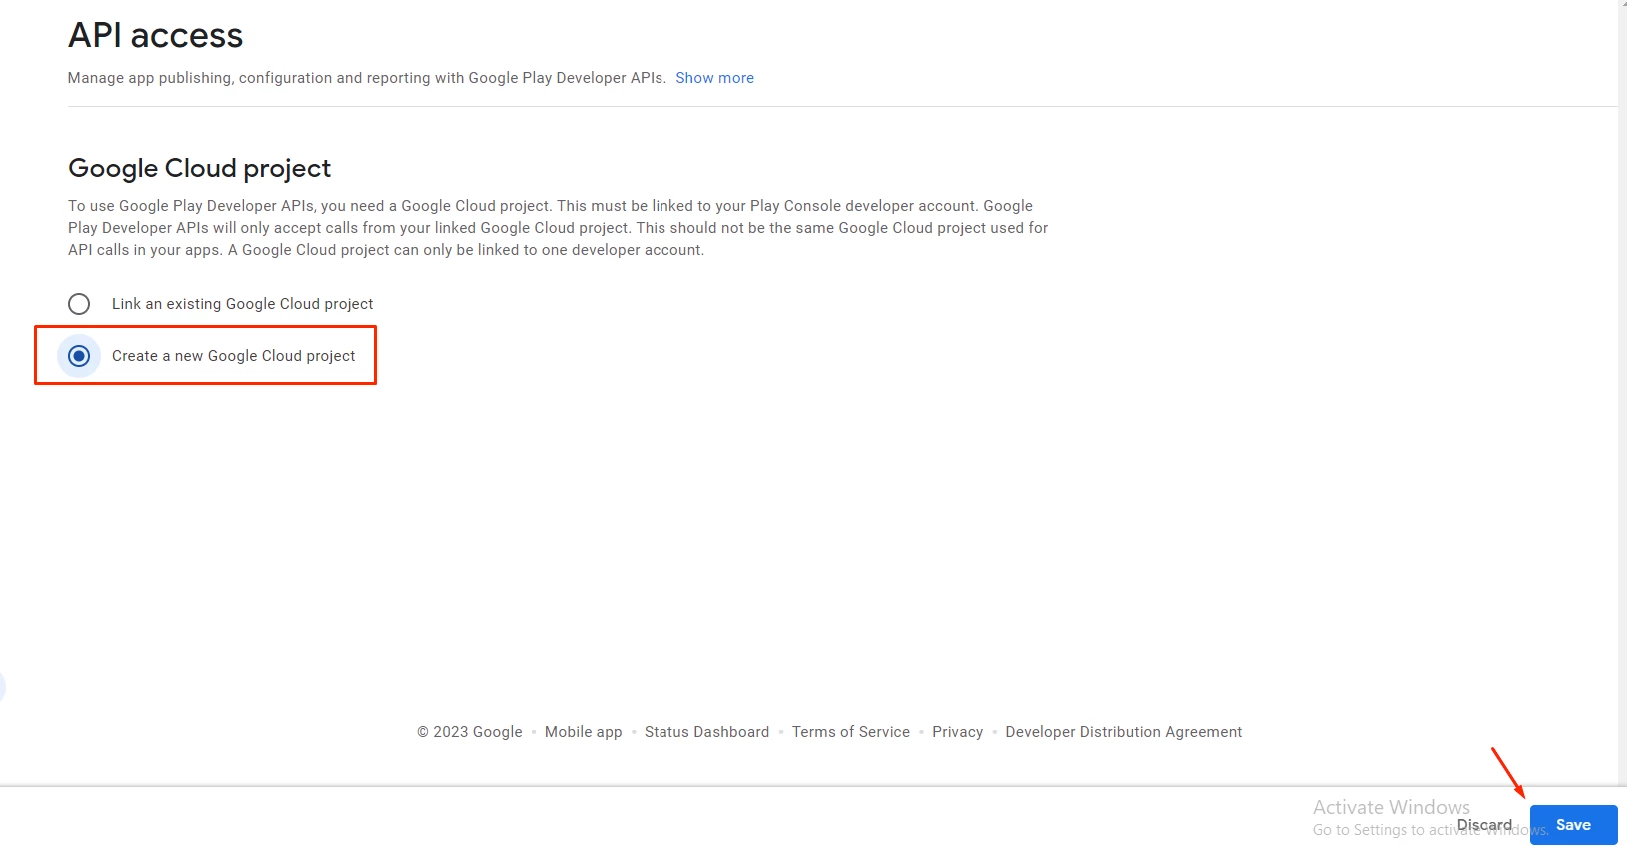
Click "Create a new Google Cloud project", then click "Save".
Your Google Play Developer Account is instantly connected to the Google Cloud Project. Click "View in Google Cloud Platform".
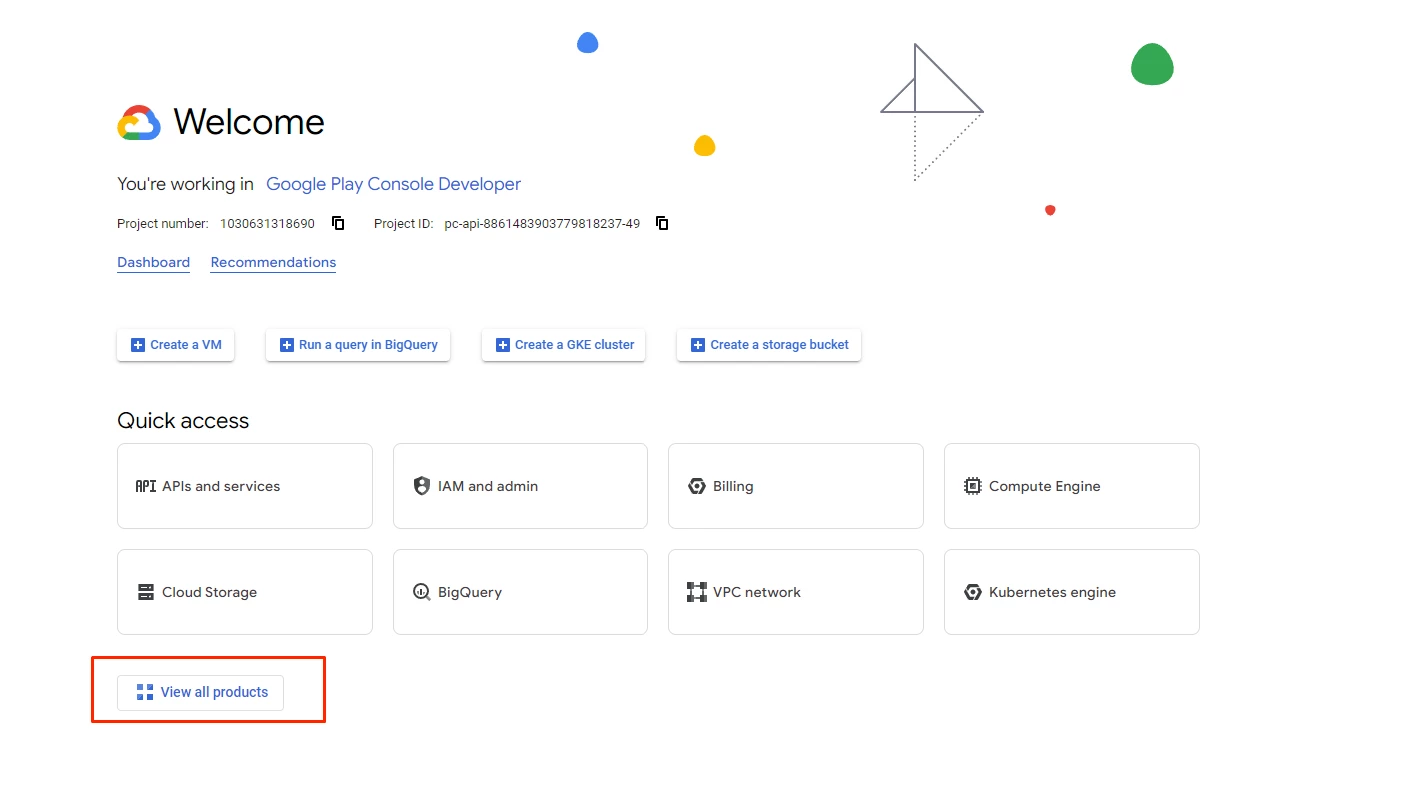
Click "View all products".
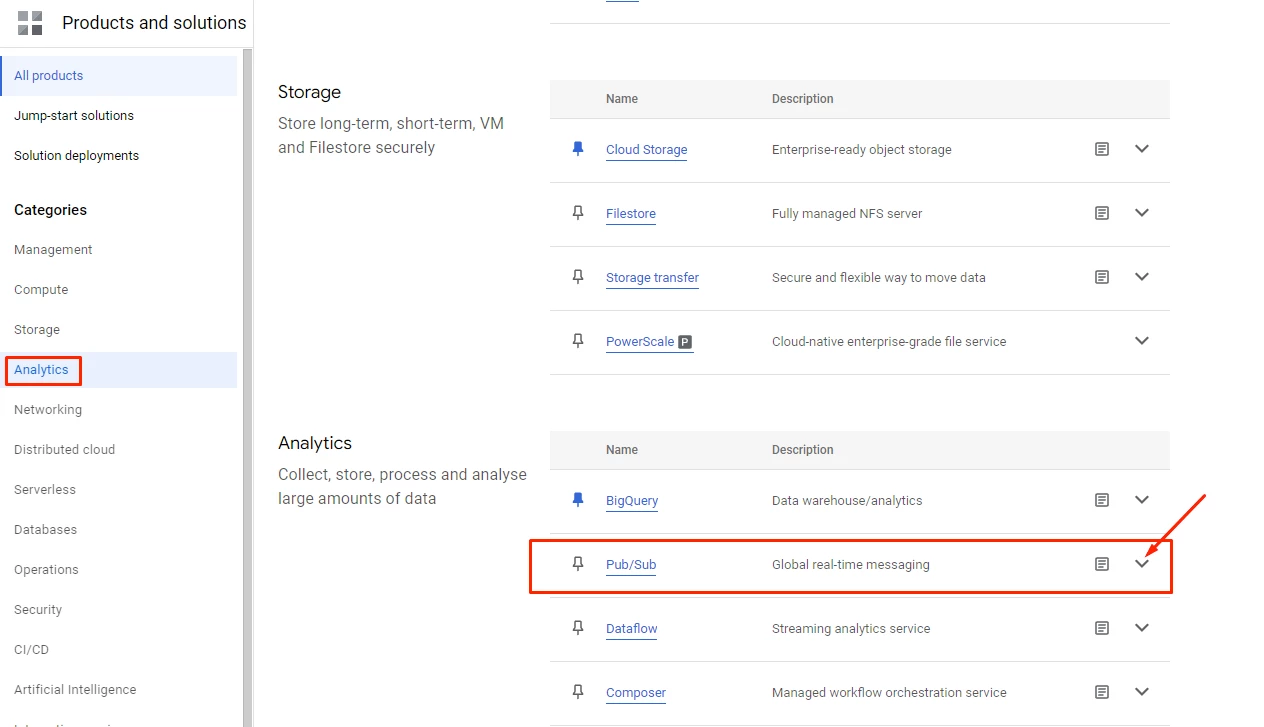
Scroll down till you reach "Analytics", and select "Pub/ Sub".
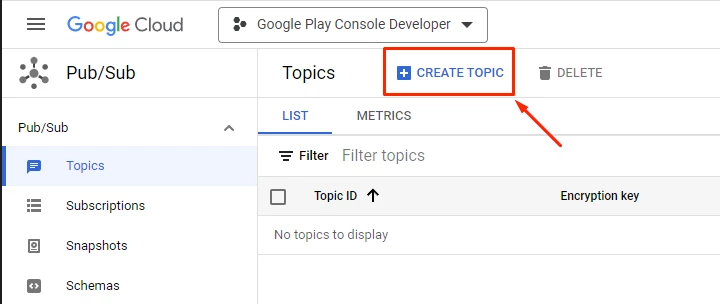
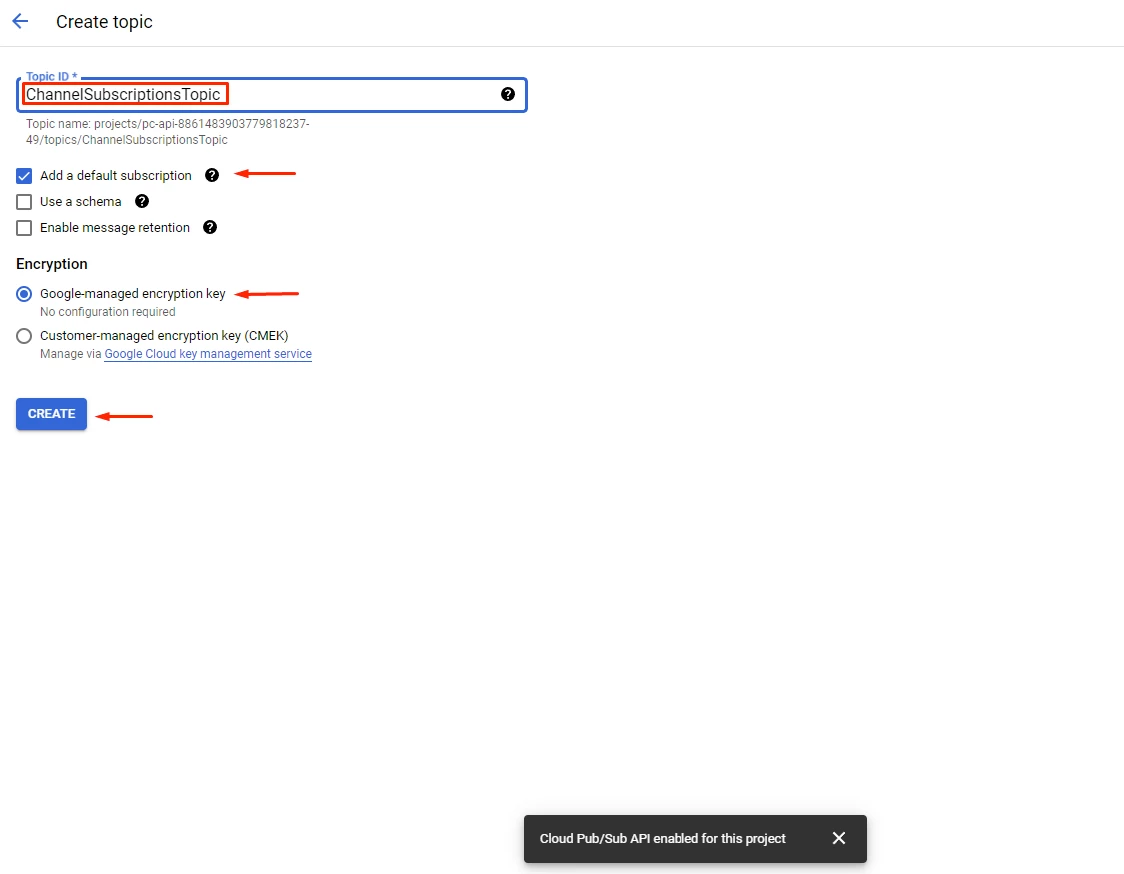
Click "Create Topic".
- Add Topic ID [ChannelSubscriptionsTopic]
- Mark "Add a default subscription"
- Mark "Google-managed encryption key"
- Then click "Create"
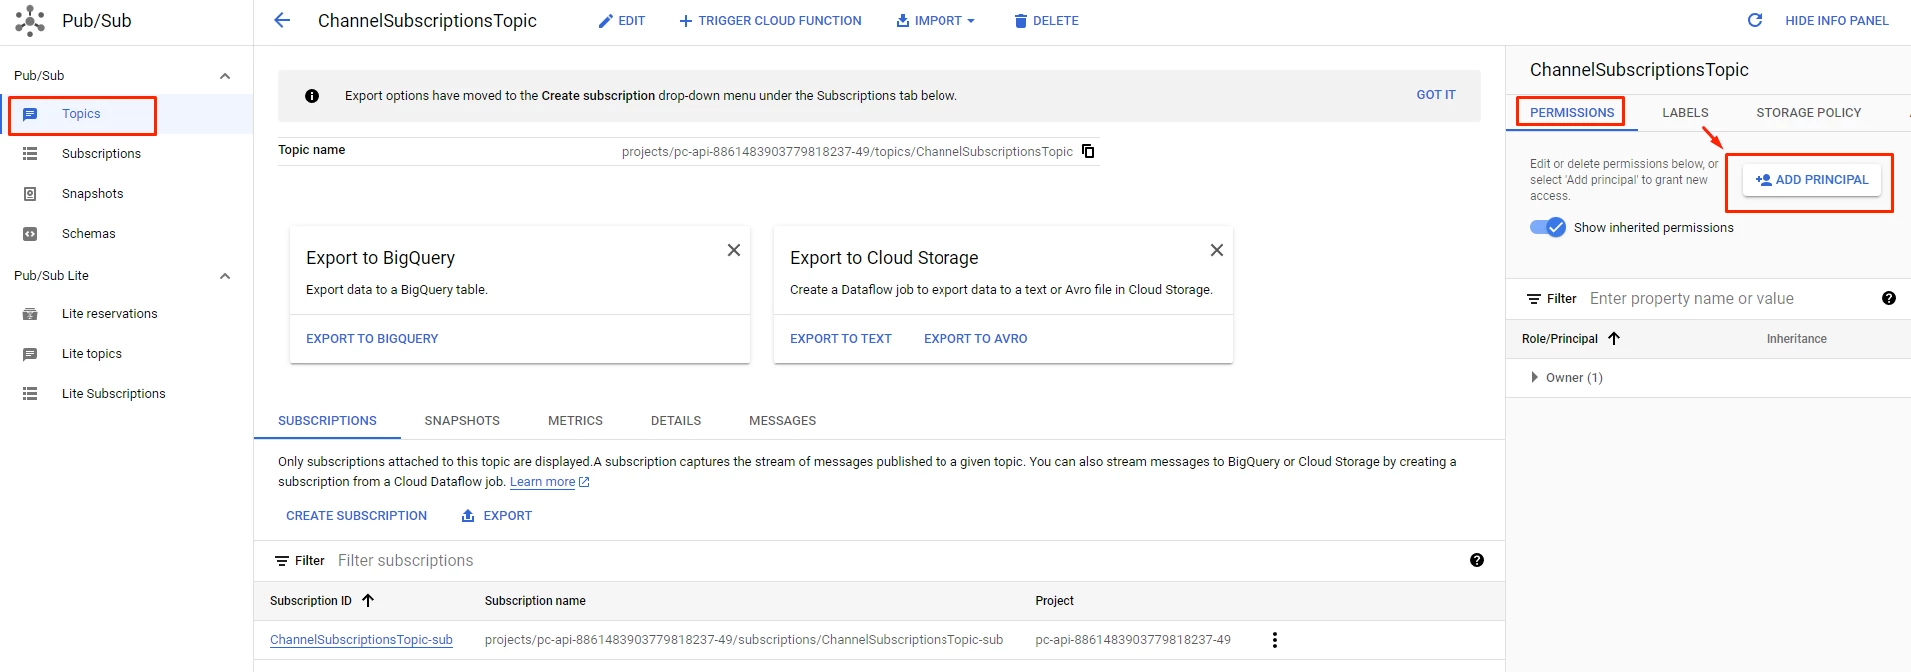
From the "Topic" page, go to the "INFO PANEL" on the right, select "PERMISSIONS" and click "ADD PRINCIPAL.
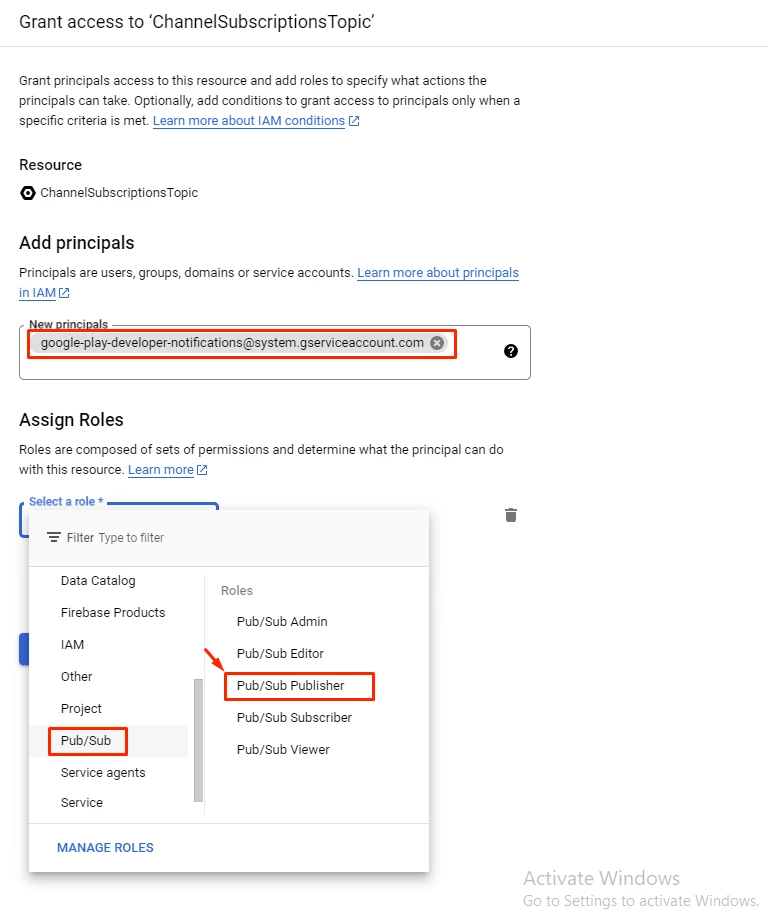
Add New principal: [Fixed] Add [email protected]
- Select a role: Pub/ Sub => Pub/ Sub Publisher
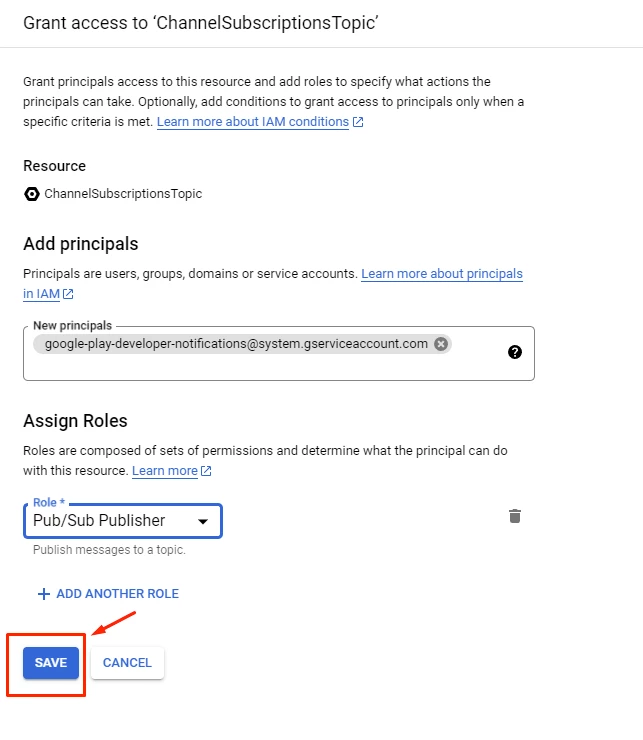
Then click "Save".
Copy the Topic name and save it for later.

Then go back and click on your Topic to add your subscription

Add subscription ID: nandboxbackend
- Mark "Push"
- Add nandbox Endpoint URL: [Fixed]https://w1.nandbox.net:4020/google/in-app-billing
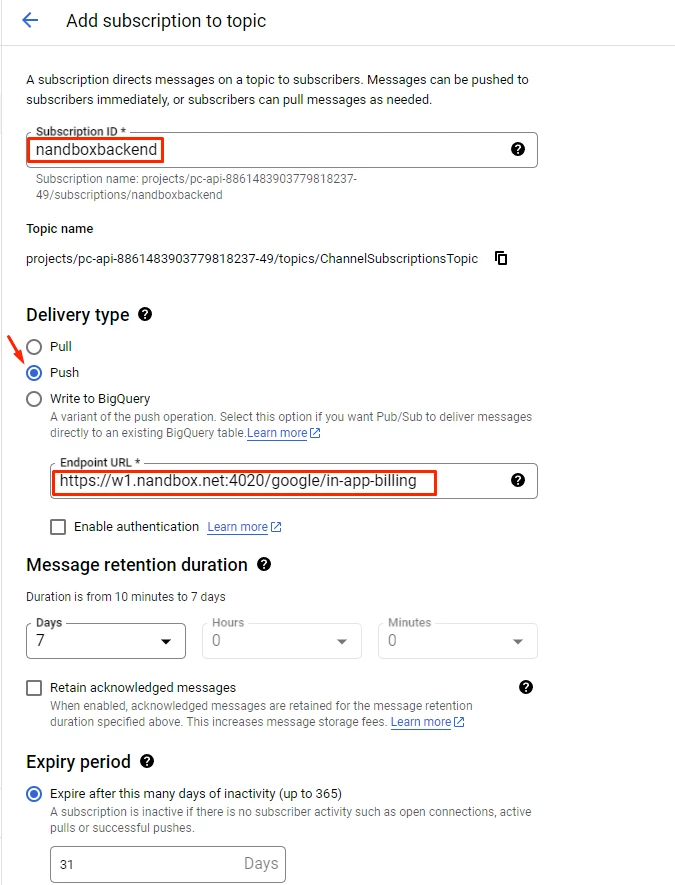
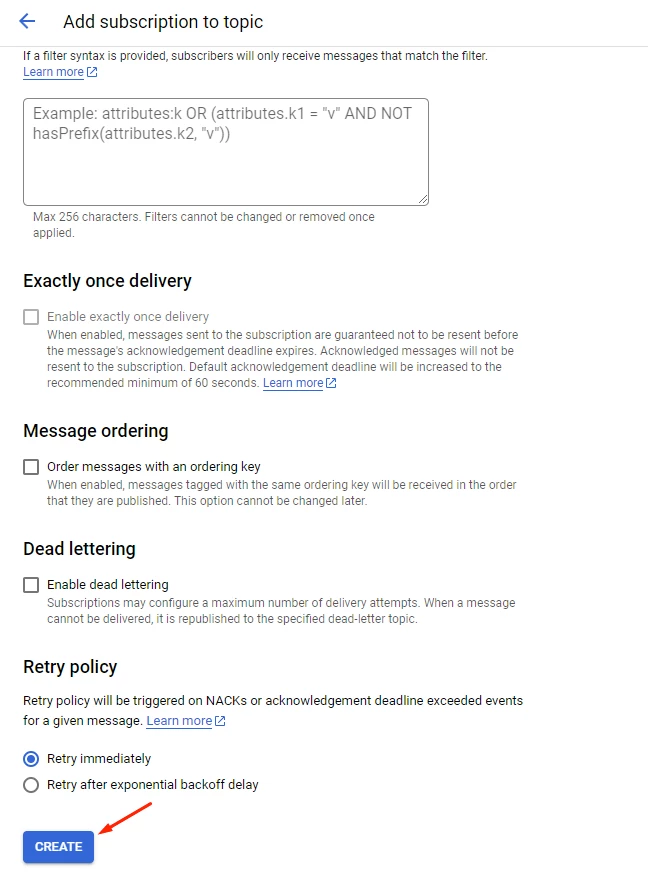
You can skip the rest of the required information and click "Create".
Make sure to refresh your Google Console page and select "API access" to check all your changes.
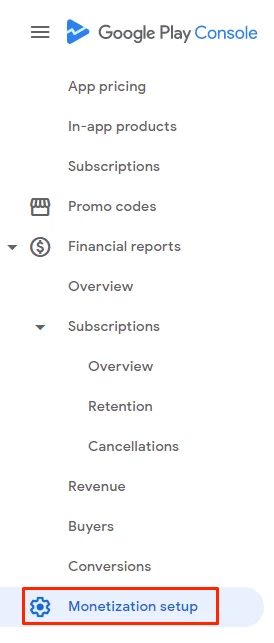
Go back to your Google Play console, select your app, and then select "Monetization setup".
Paste the Topic Name you copied before. You can also send a test notification to verify your proper configuration.
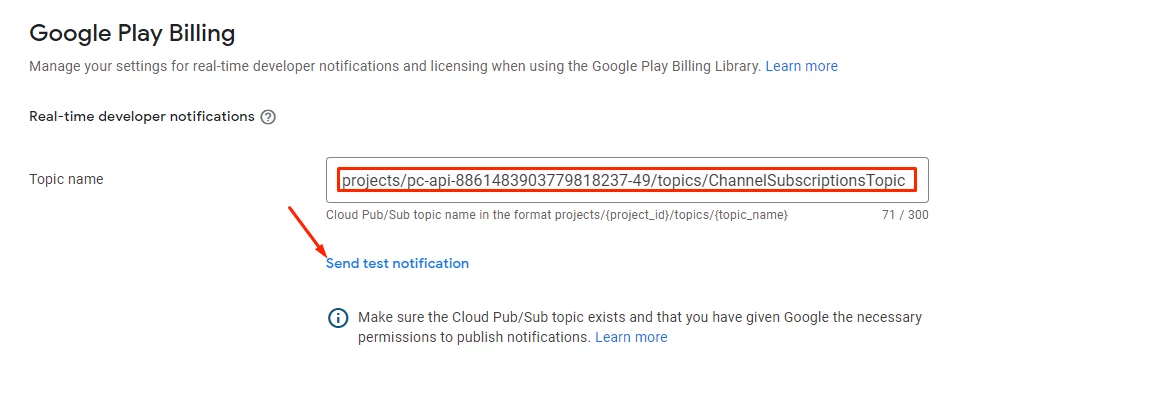
Once tested, click "Save changes".

Create a Service Account
A service account is used to verify the in-app purchases.
Go back to Google Cloud, click "IAM and admin" and click "CREATE SERVICE ACCOUNT".

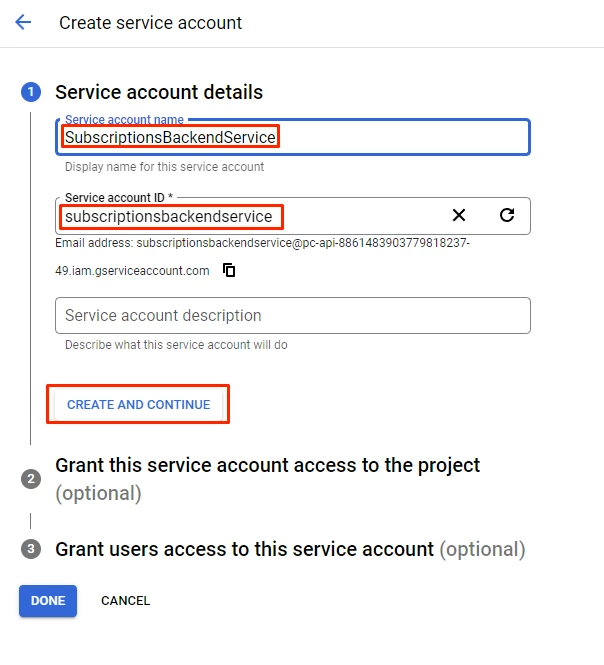
Add service account name: SubscriptionsBackendService
- Add service account ID: SubscriptionsBackendService
- Click "CREATE AND CONTINUE"
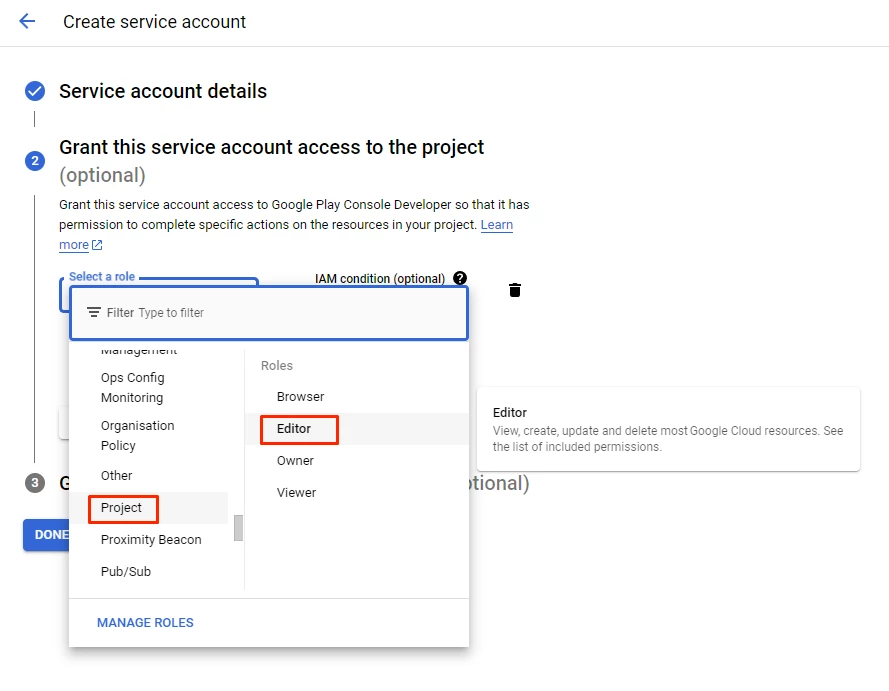
Select a role: Scroll down till you find "Project", hover over it, select "Editor", and click "Done".
Adding Key
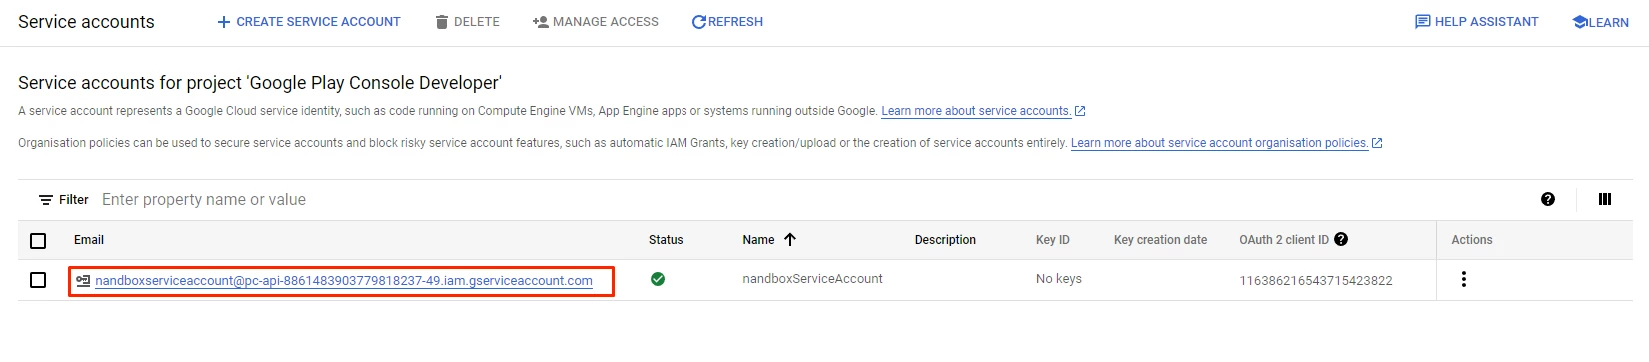
Click on your created service account.
After selecting "Key" page, click "ADD KEY", make sure to choose "JSON", then click 'Create'.
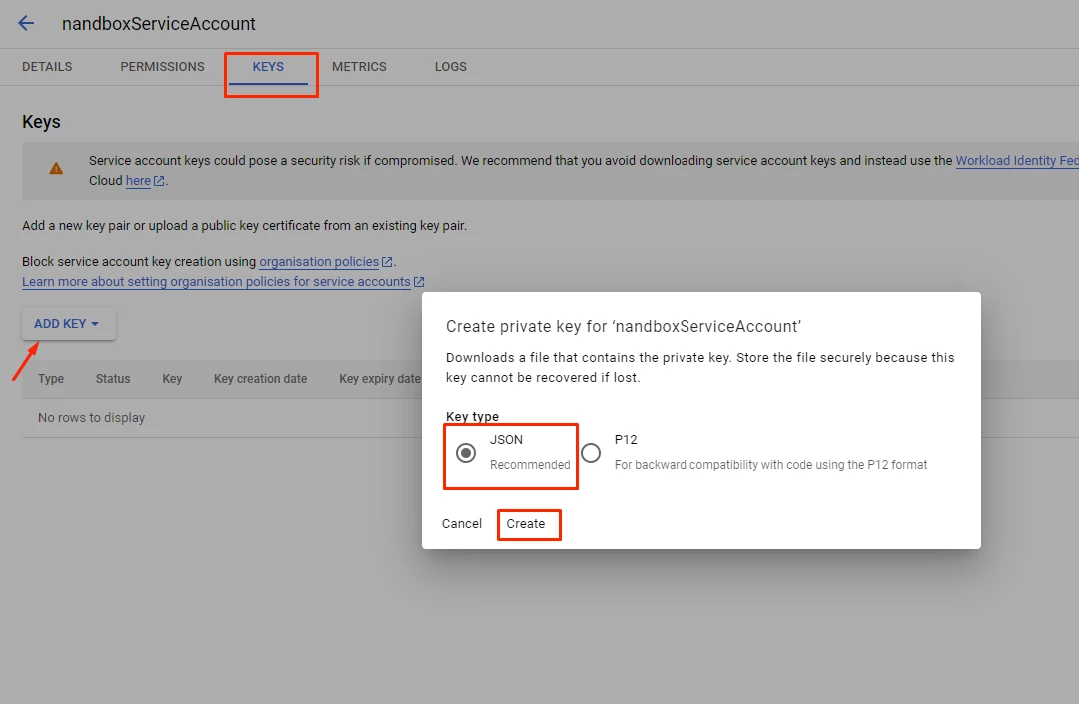
Your JSON file will be downloaded automatically once you click "Create", Make sure to save it for later.
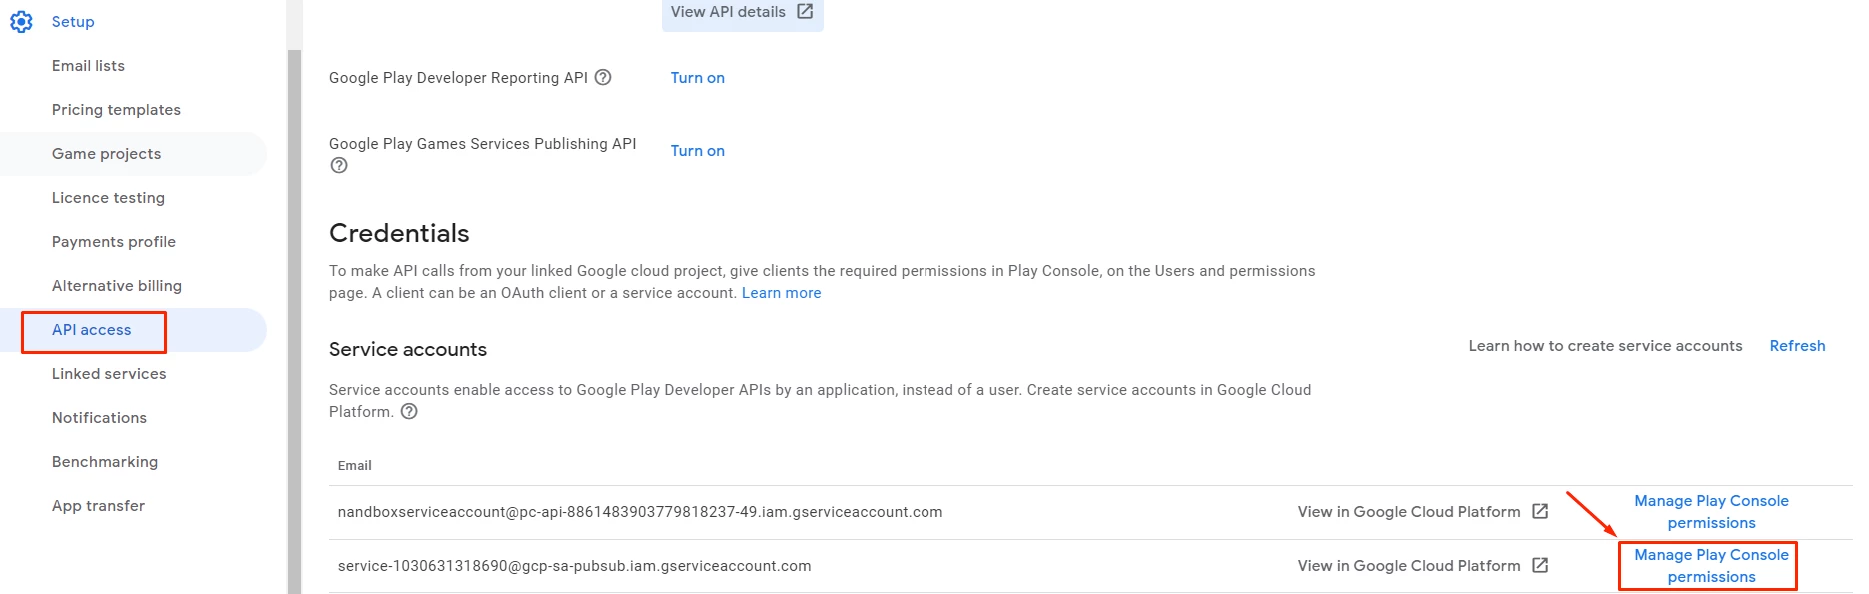
From your Google Console account, Go to the "API access" page and click "Manage Play Console Permissions" for the service account you created.
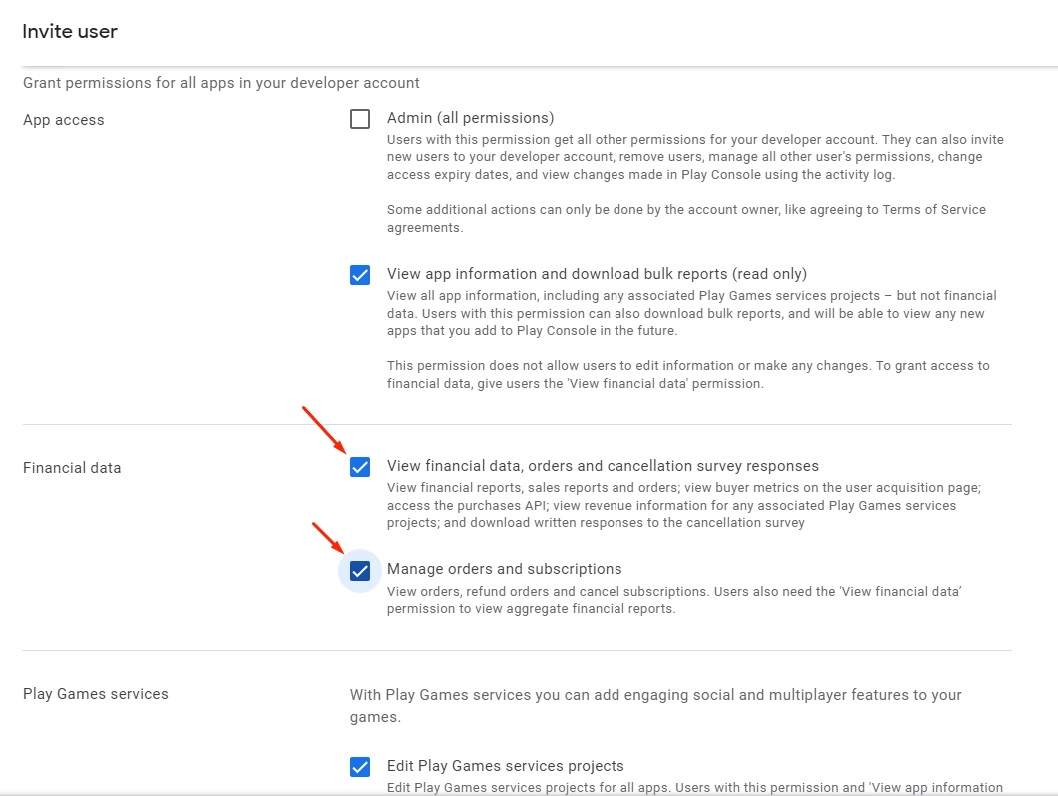
Mark on all Financial Data permissions
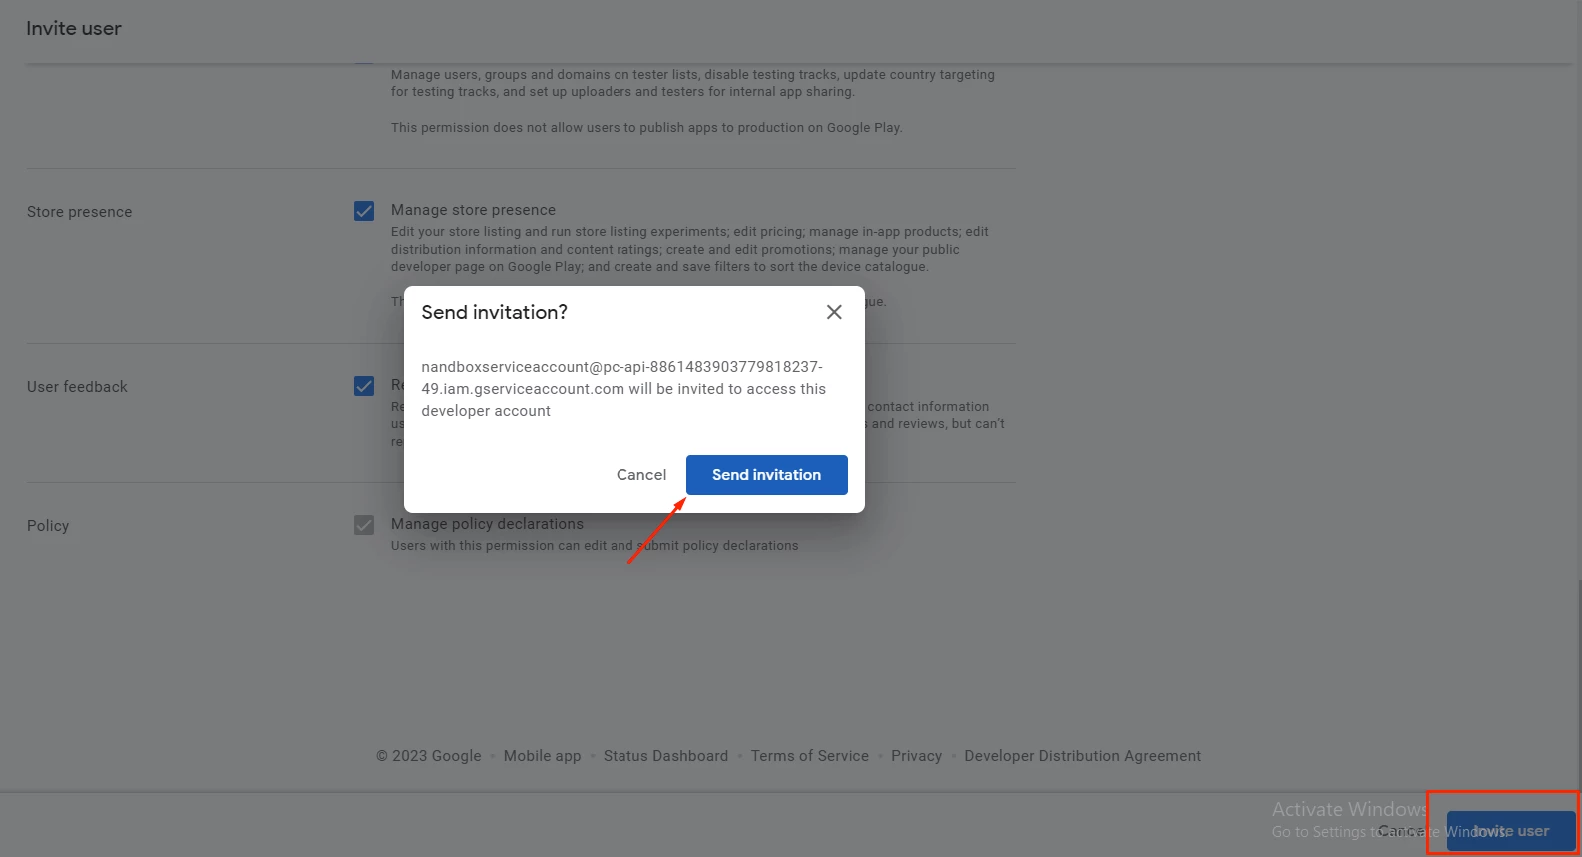
And click "Send invitation".
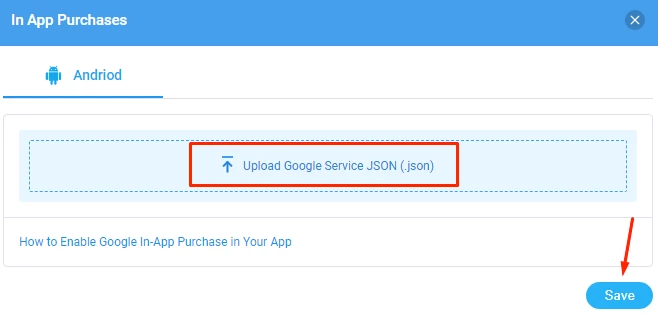
Go to your App Builder
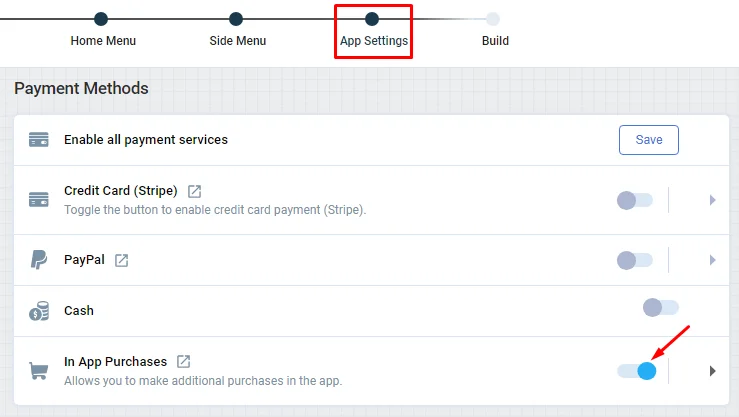
Land on the "App Settings" page, scroll down till you reach "In-App Purchases", press the toggle first to enable, and then configure it.
Upload the JSON file you downloaded before, then click "Save".
That's it, you're done now.
Test your Subscription before Publishing
One of Google's features, license testing, allows you to test payments made in your app without having to use real money.
Note that before implementing these steps, you need to upload your app bundle to the internal testing section FIRST. Check out this document for testing your app via Internal testing feature
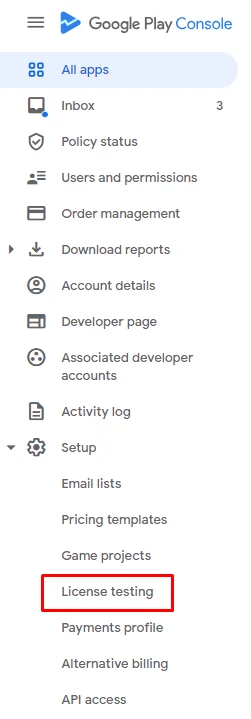
From your Google Play console dashboard, select 'License testing'.
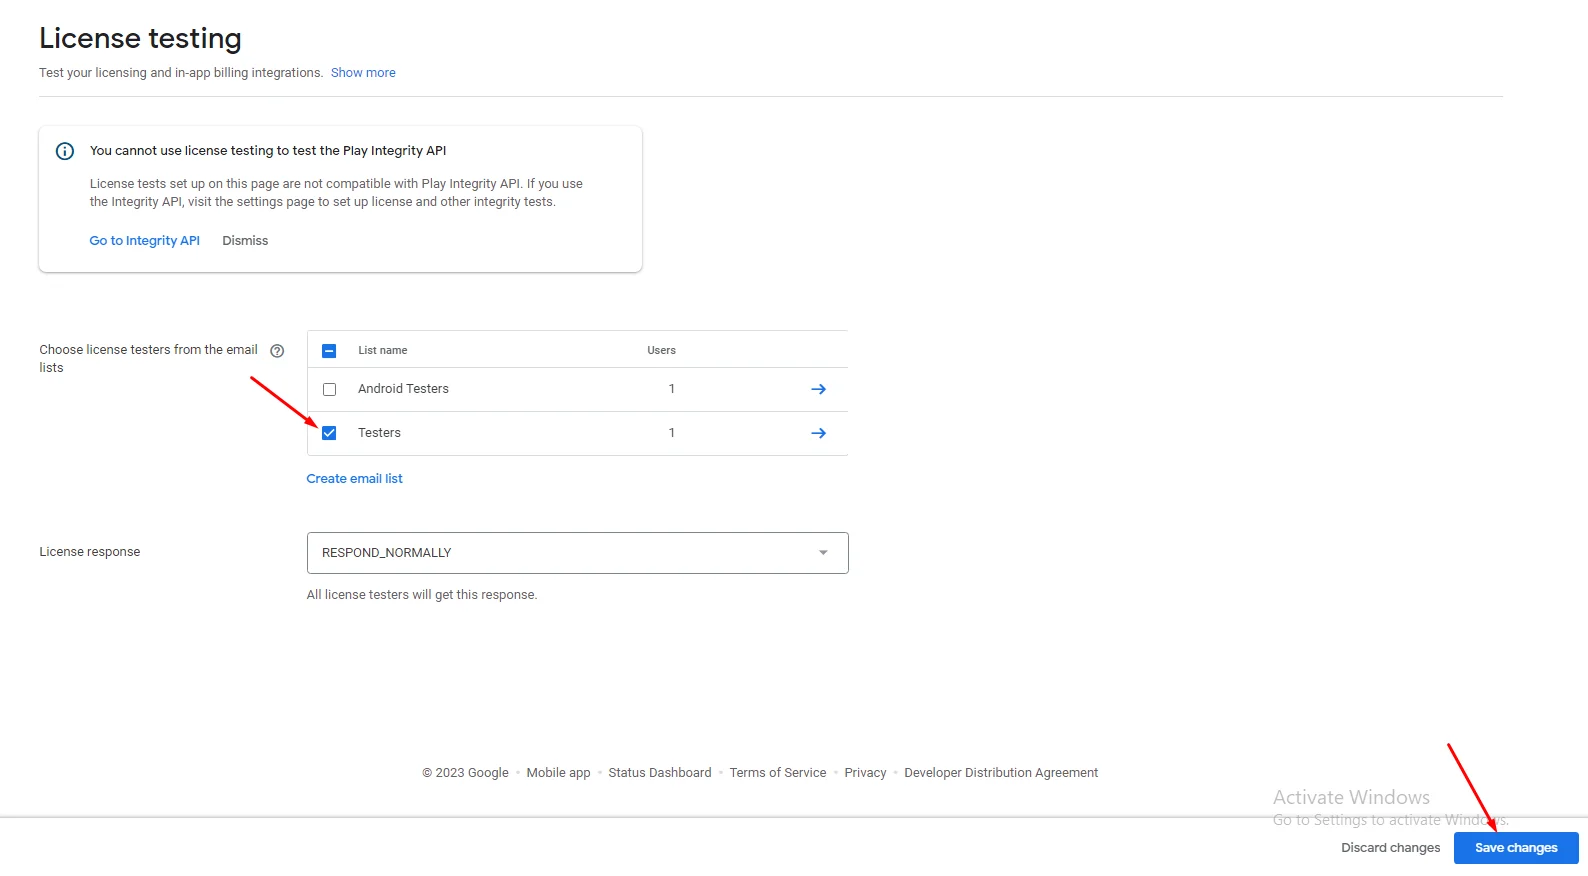
You can add yourself to a list, mark it on the list, and click 'Save changes'.
- If your channel subscription is set up to run every week, license testing will attempt to speed up the testing process by decreasing the time to 5 minutes only. Additionally, one month will be 5 minutes, three months will be 10 minutes, six months will be 15 minutes, and a year will be 30 minutes.
- One advantage of licensing testing is that when you test your subscription payment, you will be asked if you want to examine what your users would see in both successful and unsuccessful payment scenarios.
Updated about 1 year ago