
This section guides you through building a searchable list
Example:
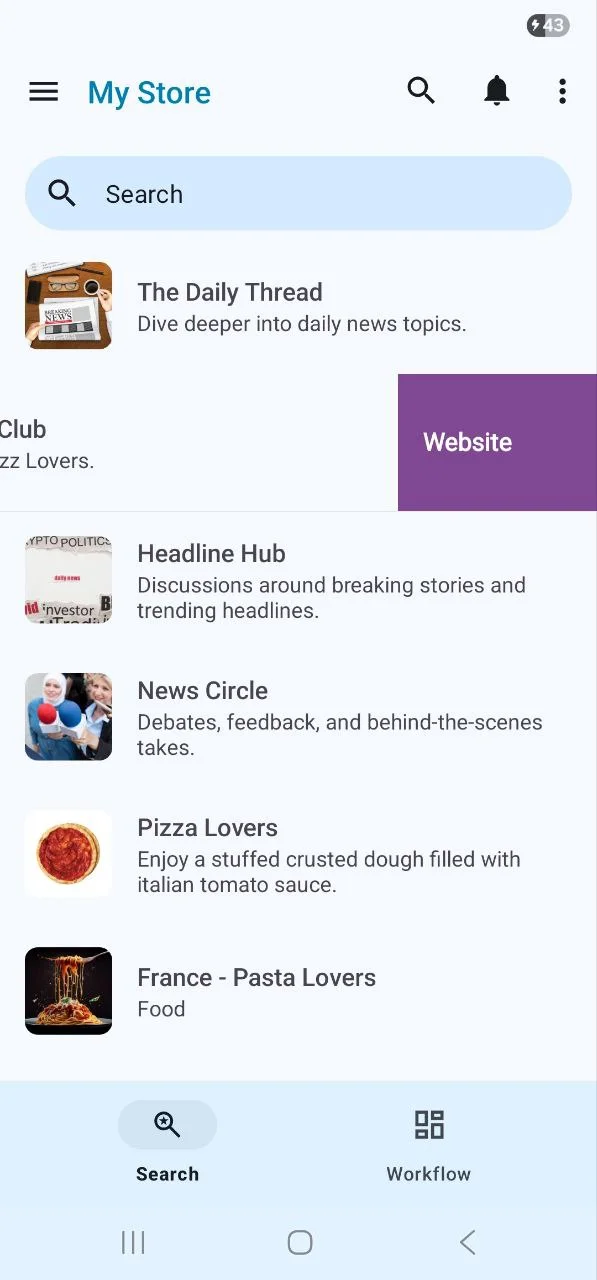
Let’s say you're displaying Groups & Channels in a list.
You want users to filter between them using a search bar and UI controls like segmented buttons, filter chips, or suggestion chips.
You can configure one element to represent Groups and another for Channels, then apply the Filter clause to control what gets displayed.
Next, we’ll walk through how to set up a query builder condition for each element—so you can test and confirm that each input updates the search results as expected.
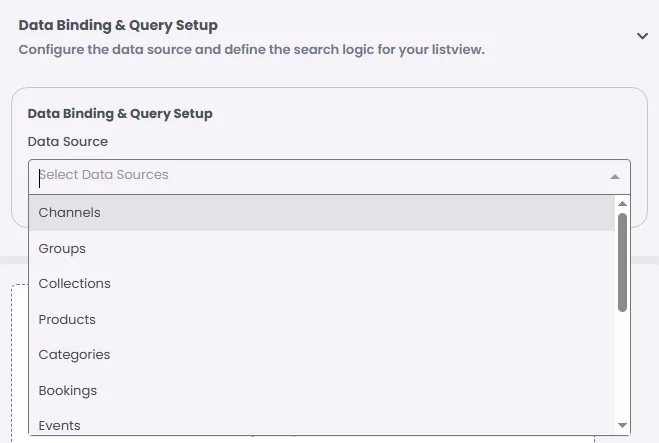
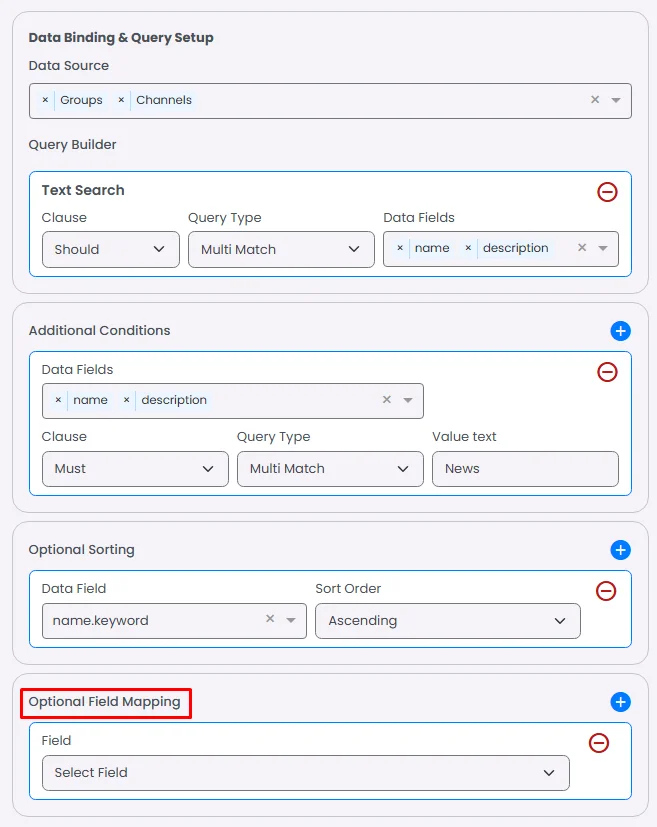
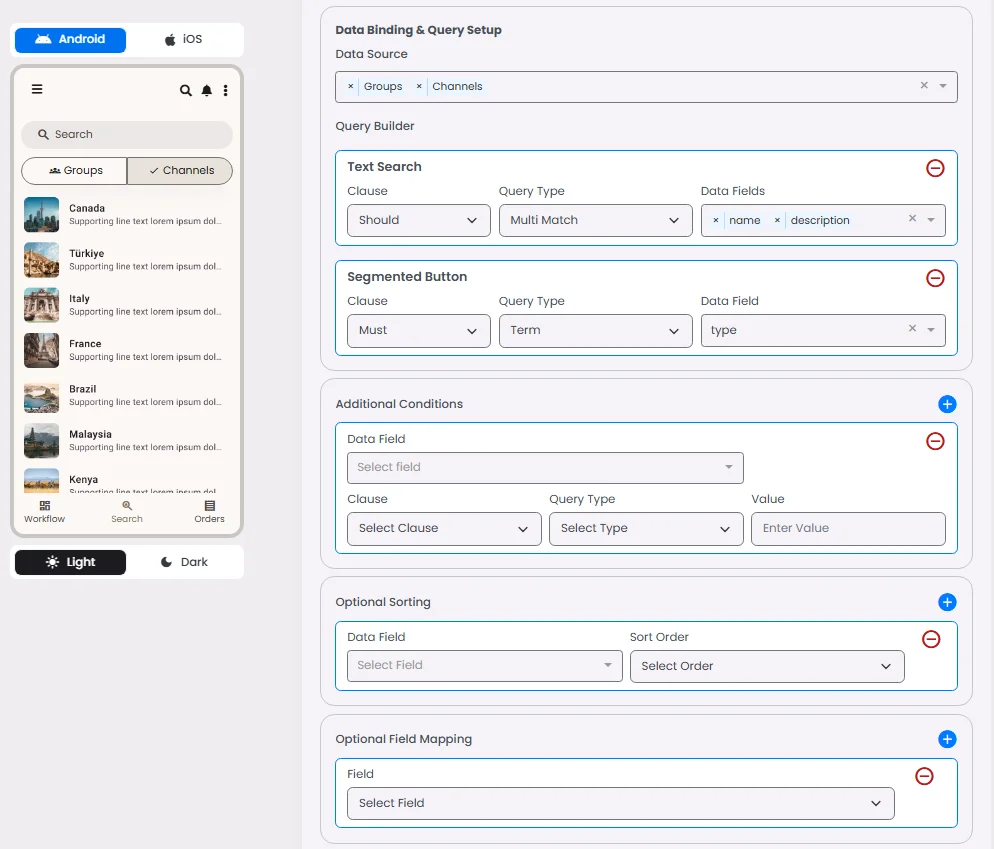
🗂️ Data Source
You need to determine what this list will show when a user searches for a certain item. You There are three types of data presented here:
- Channels
- Groups
- Collections
- Products
- Categories
- Bookings
- Events
- Catalogs
- Images
- Videos
- Audio Files
- Website URLs
- Location Maps
- Users
Next, proceed with the query-building process by dragging and dropping your search elements.
Using the example as a guide, let's consider dragging and dropping the Search Bar.

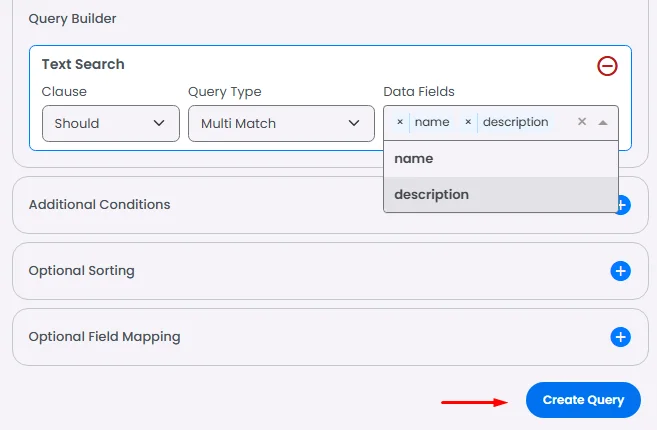
Choose ‘Text Search’ and click ‘Add Query Item.’
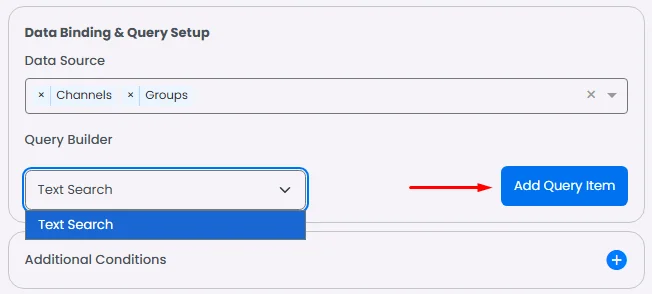
🛠️ Query Builder
You need to configure three sections in this document.
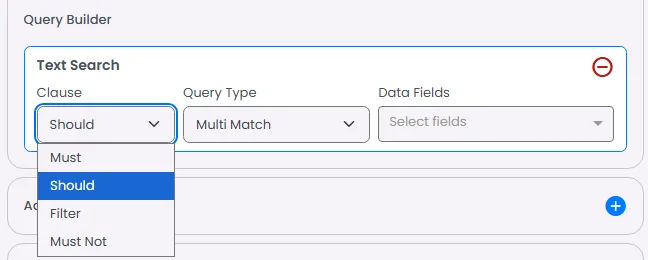
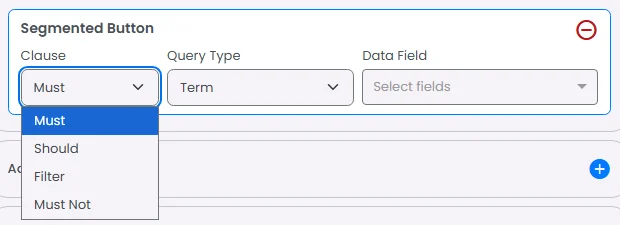
Clause
You have four options:
- Must: You want only documents that definitely match a certain condition.
- Should: You want to rank documents higher if they match, but you don’t want to exclude those that don’t.
- Filter: You want to apply exact constraints (e.g., tags, categories, date ranges) that don’t influence ranking.
- Must Not: You want to exclude documents matching a condition.
Based on the example, we will choose Should.
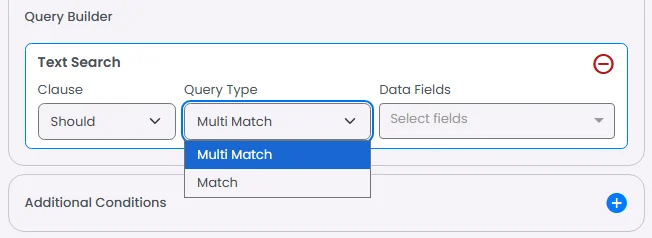
Query Type
- Match (to match one data field)
- Multi Match (to match multiple data field)
Based on the example, use Multi Match when the search text matches both the name and description fields of a group or channel. Use Match if only one of those fields (the name or the description) needs to be matched by the text.
Data Fields
Choose where you can find the condition you entered: Name, Description. Then click ‘Create Query.’
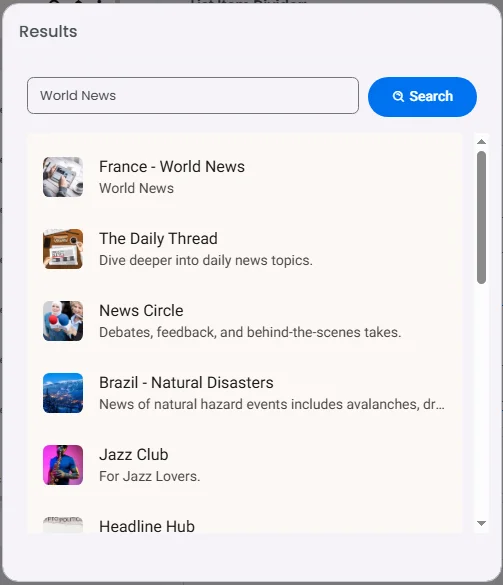
Add a value of a name of one of your channels or groups and click ‘Search’ to see your results.
➕ Additional Conditions
The Additional Conditions section lets you define extra filtering rules that apply to the Search ListView results, regardless of any user input or search query. Use ‘Additional Conditions’ when you want the list of your search results to always respect certain constraints—for example, only show items from a specific category, type, or tag.
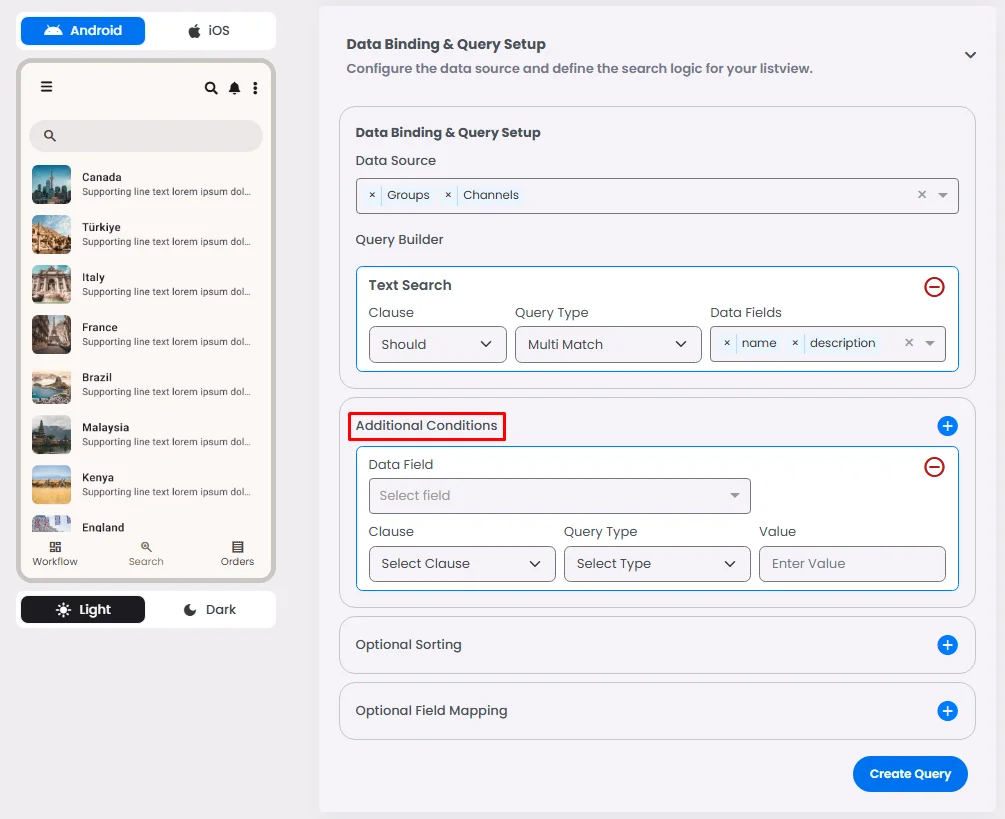
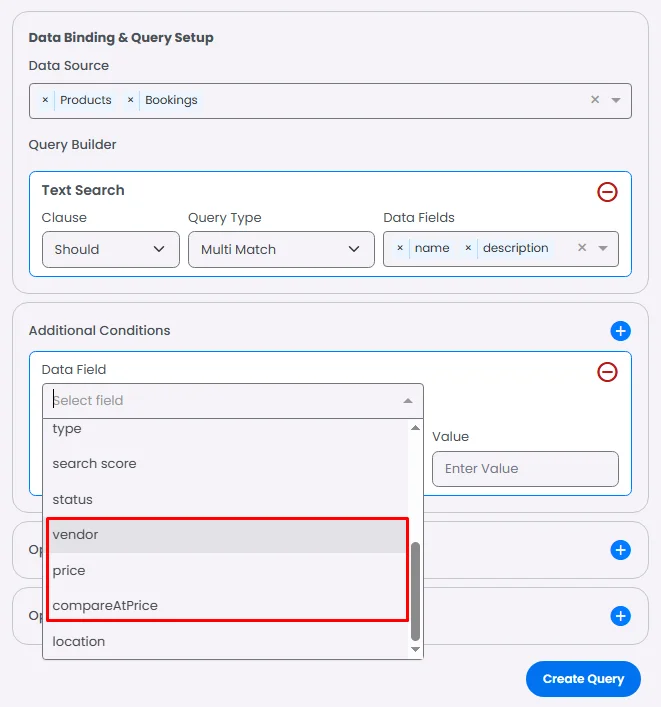
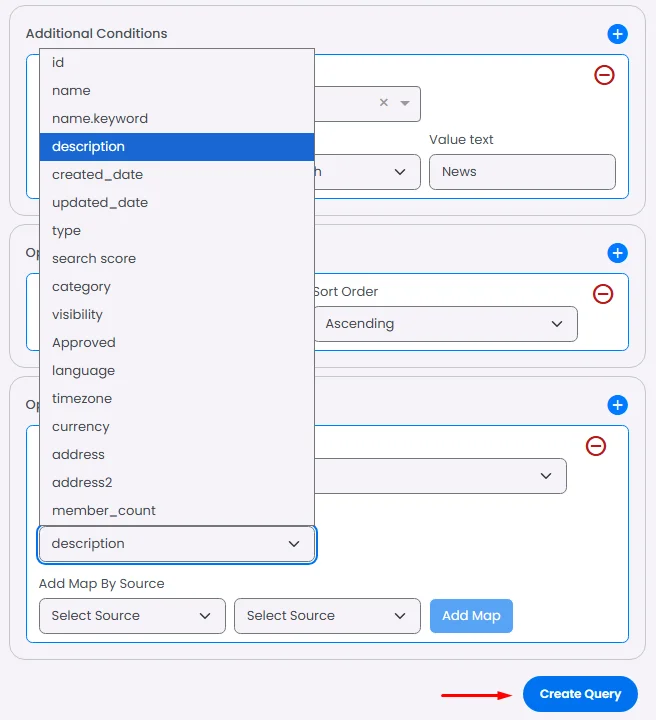
Data Field
Choose where you can find the condition you entered: id, name, name.keyword, description, created_date, updated_date, etc.
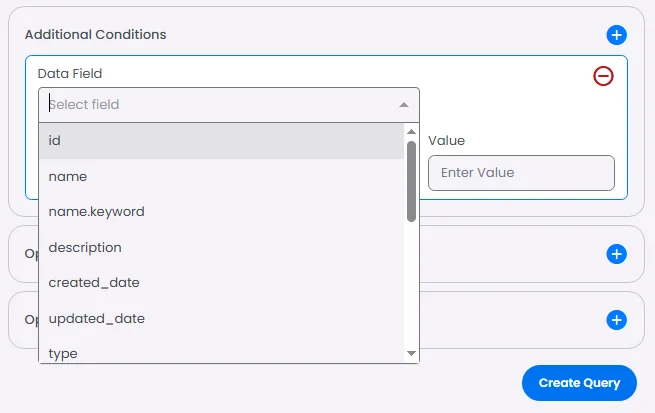
The data field is determined by the selected data source. Each source exposes its own relevant fields. For example, when you include products, bookings, or events, the data field will display commerce-related fields such as vendor, price, compareAtPrice, and similar attributes. These fields will not be available if the source is set to community items like groups or channels, since those data types do not carry pricing information.
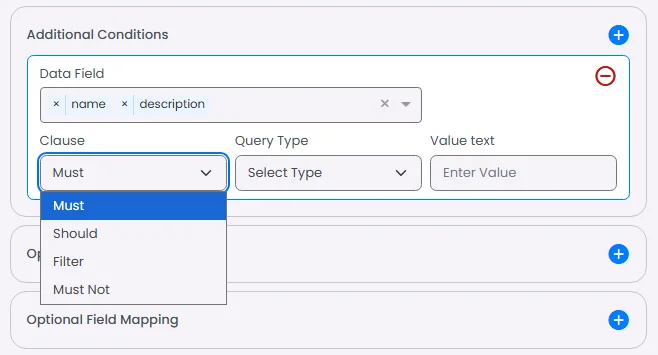
Clause
You have four options:
- Must: You want only documents that definitely match a certain condition.
- Should: You want to rank documents higher if they match, but you don’t want to exclude those that don’t.
- Filter: You want to apply exact constraints (e.g., tags, categories, date ranges) that don’t influence ranking.
- Must Not: You want to exclude documents matching a condition.
Based on the example, if you want the list to display only News channels and groups, you should set the clause type to MUST, ensuring the condition is strictly applied.
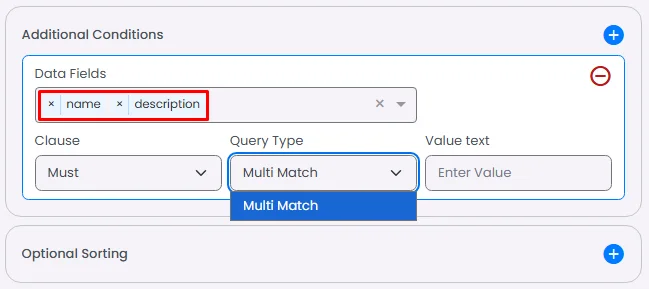
Query Type
- Match (to match one data field)
- Multi Match (to match multiple data field)
Based on the example, only the Multi Match option will show, as we chose two data fields: name & description.
Value
This section is for testing how the search list will look.
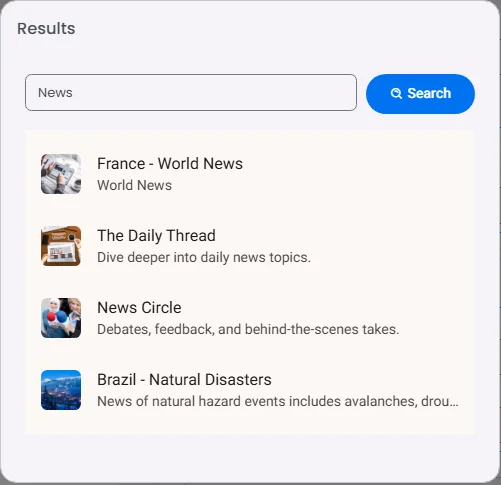
Based on the example, if you have channels and groups that include the word 'News' in their names or descriptions, add the text 'News' to the value.
Then click ‘Create Query.’
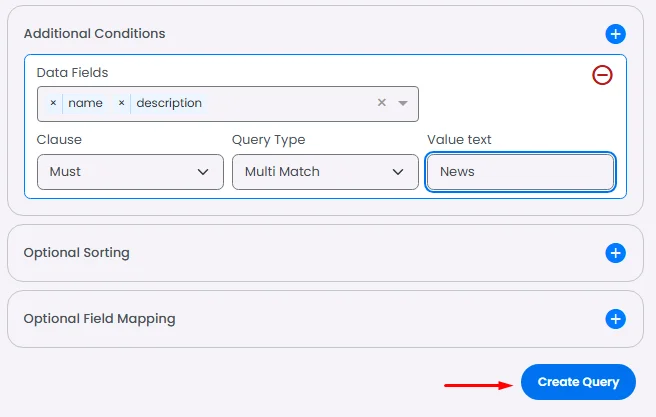
Type your value ‘News’ and click ‘Search’ to see your results.

🔃 Optional Sorting
This section is entirely optional for you, as it controls the sorting of the search results that will appear for users:
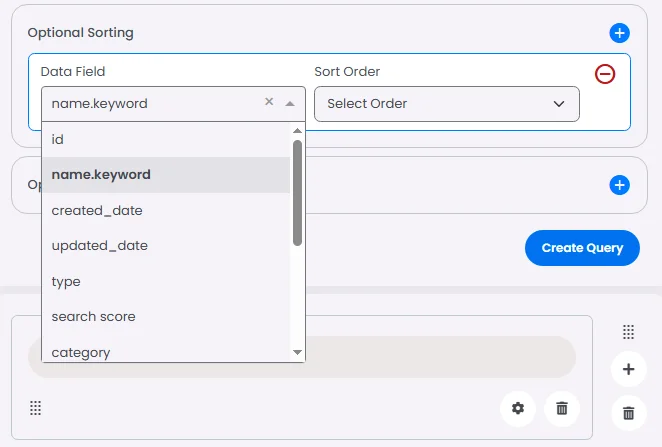
Data Field
Choose the type of data field.
Based on the example, we will choose ‘name.keyword.’
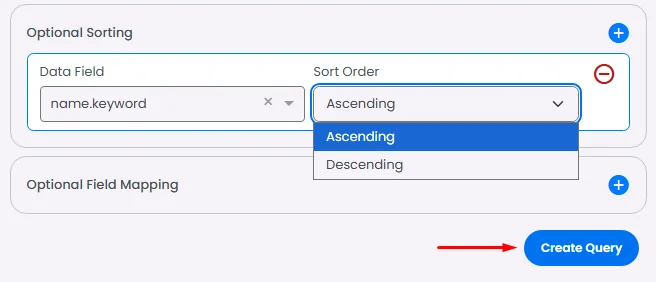
Sort Order
It is the order of the data field: Ascending & Descending.
Then, click ‘Create Query’ and then ‘Search’ to see your results.
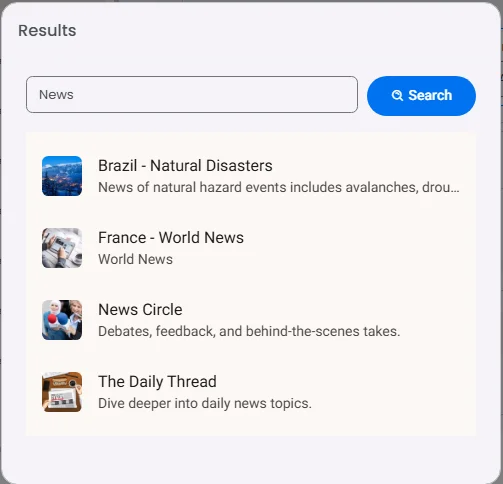
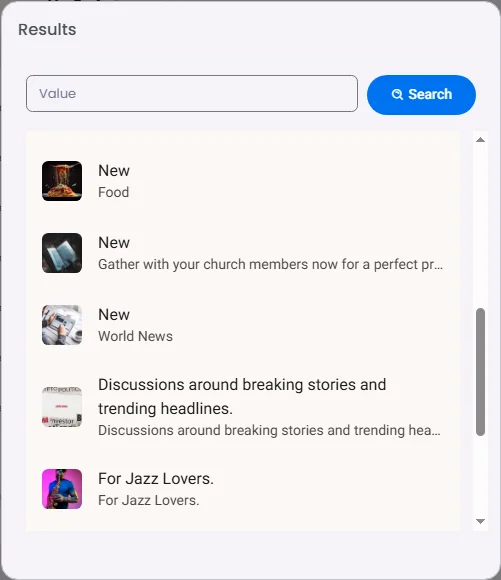
As shown in the example, you'll notice that the search results differ from the previous view—this time, the News Channels are displayed in ascending order.
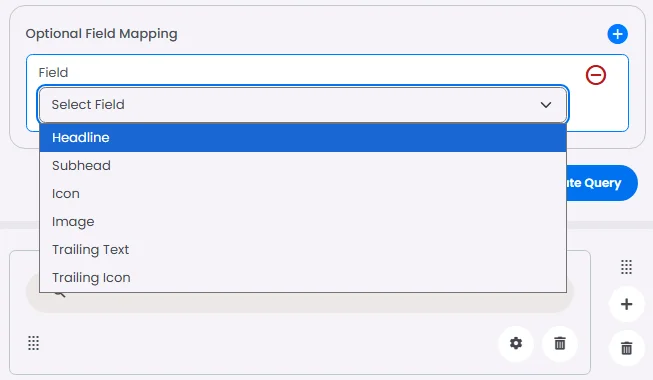
🔀 Optional Field Mapping
This section defines how the data is displayed in the list. Field mapping allows you to choose which fields appear in specific positions. For example, you can configure the list so that the channel description is shown as the headline instead of the default field. In other words, field mapping lets you replace a default field with the one you prefer.
Field
Choose the type of field.
Based on the example, we will choose ‘Headline.’
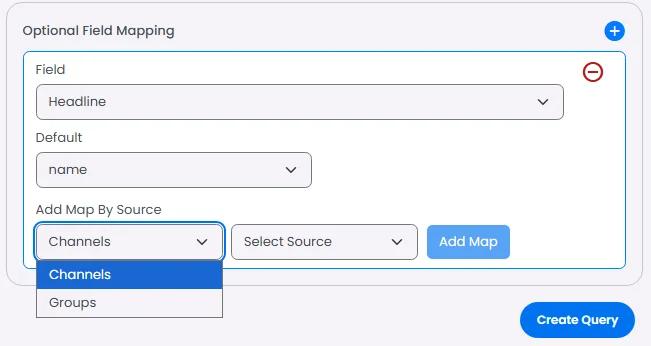
Default
Choose the field you want to be replaced with your channel's headline.
Based on the example, we will choose ‘description.’
Then click ‘Create Query’ to check your result.
As you can see, the description is shown in the headline.

Add Map By Source
This section is for more than a single data source; for example, if you want to create a single mapping for each data source (Channels & Groups), this section is for this adjustment.
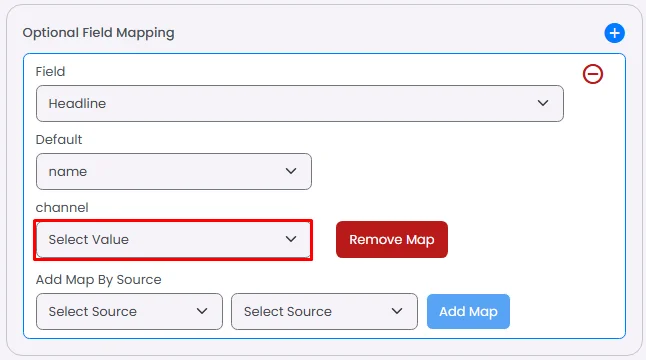
Choose Channels.
Choose ‘Use Fields’ or ‘Use Constant,’ then click ‘Add Map’:
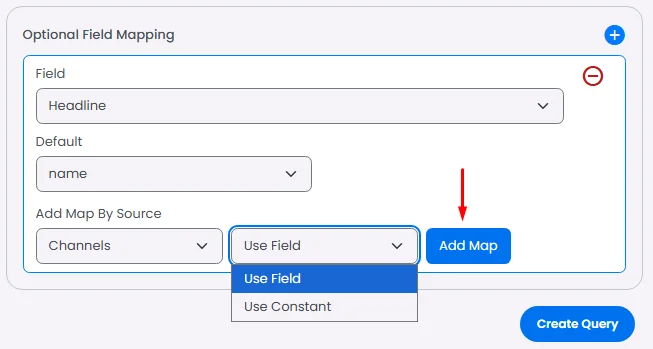
If you chose ‘Use Fields,’ you will have a dropdown menu of existing values.

If you chose ‘Use Constant,’ you can add your value manually; for example, you want to add specific text (ex: New) instead of the headline.
In this case you can ignore the default section, as each source has its own options. The default section is for a single data source.
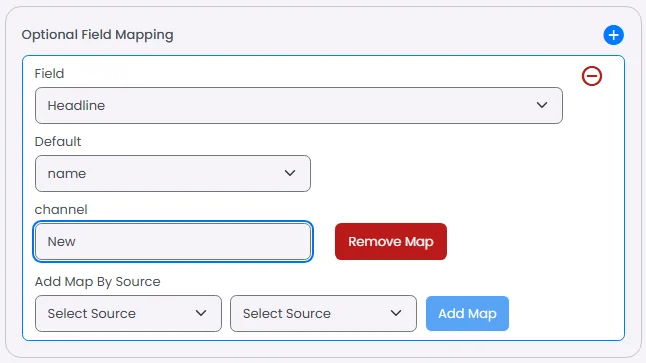
Do the same for your groups, then click ‘Create Query.’
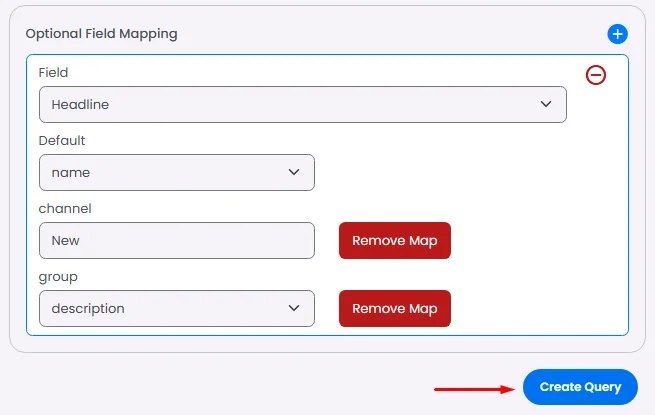
Just like the result, the channel’s headline is replaced by the value ‘New,’ and the group’s headline is replaced by the description.
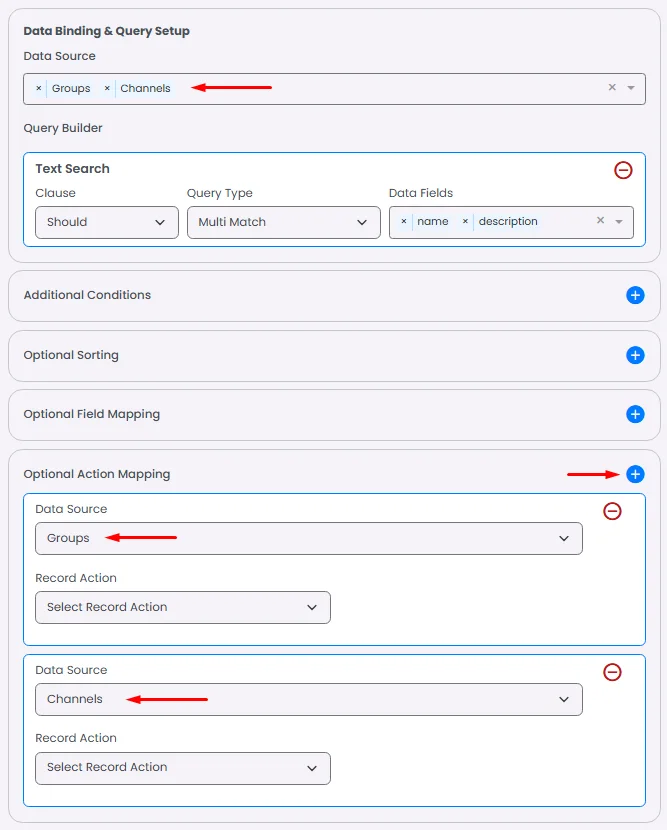
⚙️ Optional Action Mapping
This section is entirely optional for you; Optional Action Mapping allows you to create custom actions for each data source.
For example, you can add actions to the Groups data source so that when a user swipes left on a group, an action is triggered to open a certain URL. This allows you to control creating and assigning actions specific to each data source.
If you have multiple data sources in your search query, you can create one for each by clicking the (+) icon.
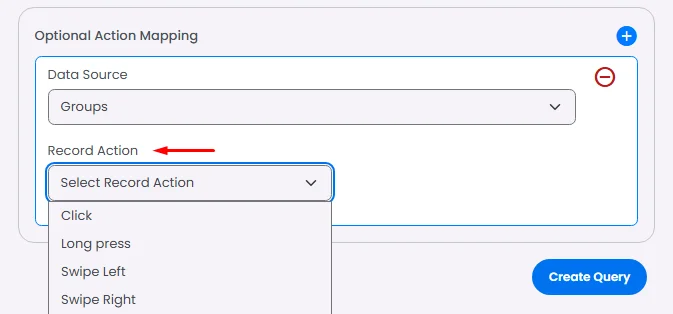
Record Action
Choose your desired record action from the list of available actions. These actions define what the user can perform on a group item within your search list.
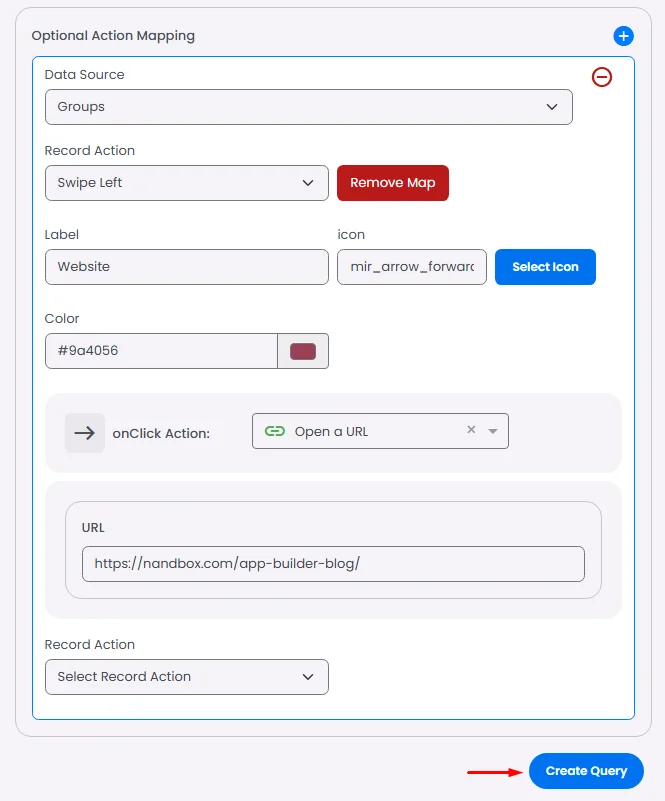
Once selected, a new field will be shown; Add a label and icon and choose a color for it.
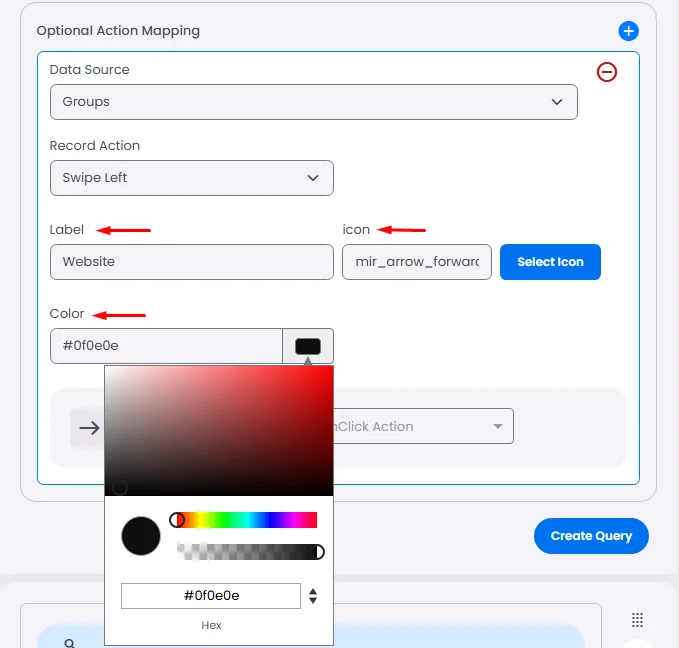
onClick Action
Now it’s time to select an action.
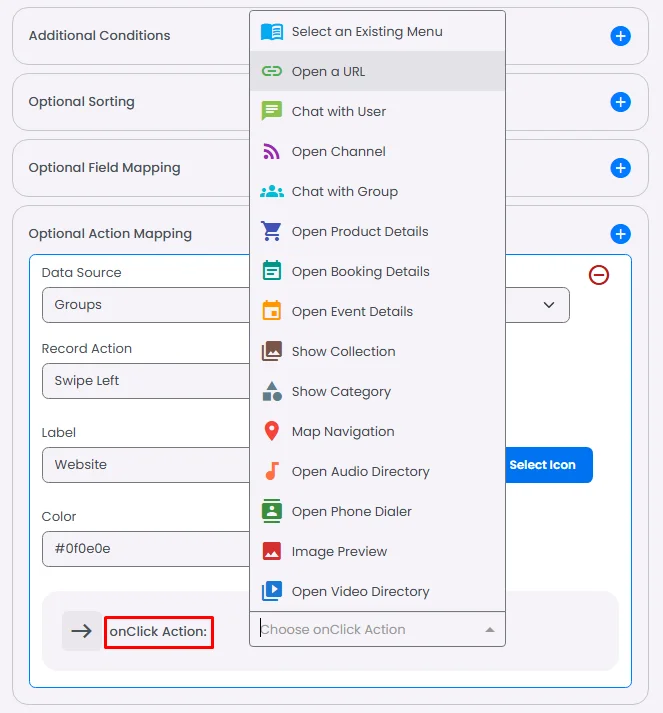
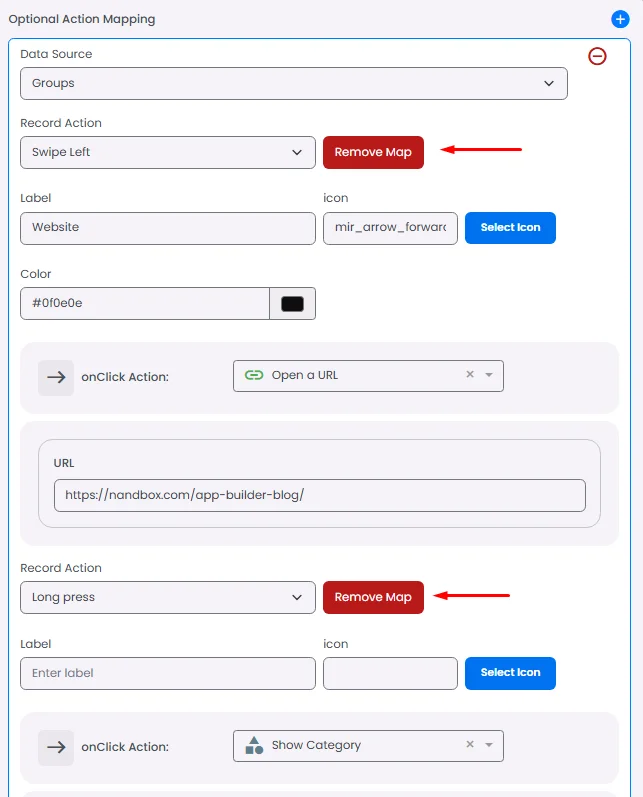
Since we created an action for swipe-left performance, you can add more actions to group items for click, long press or swipe right.
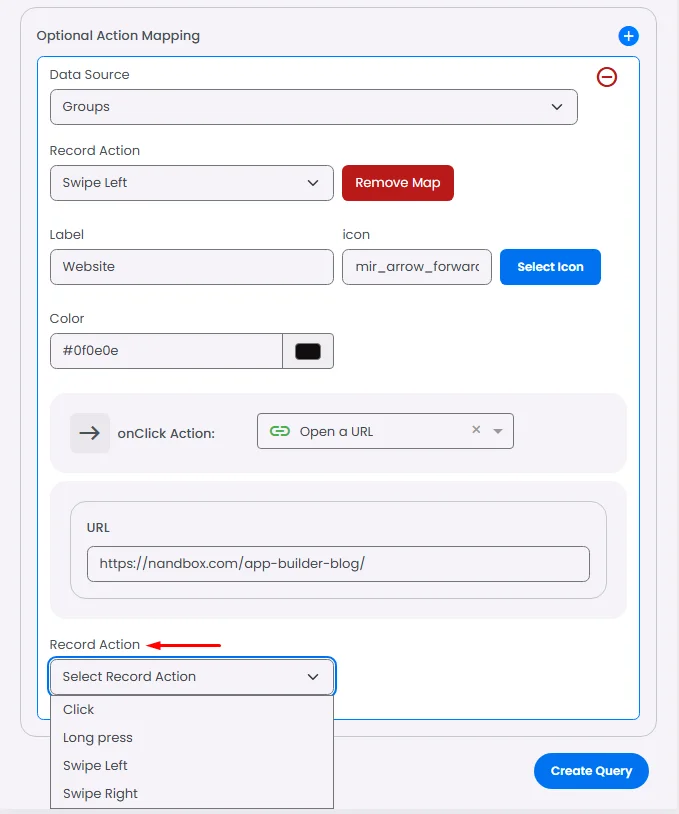
You can also delete a certain mapping if you want.
Once done, click ‘Create Query.’
🎛️ Filter Elements in Search (Chips & Buttons)
To enhance your search experience, you can attach extra elements such as segmented buttons, filter chips, or suggestion chips to your list. These components act as input triggers that help users filter search results more intuitively.
📌 In addition to the previous example, if your list contains both Groups and Channels, you can use a segmented button to let users toggle between them. One option can represent Groups, and the other can represent channels—each mapped to a query builder condition with a filter clause.
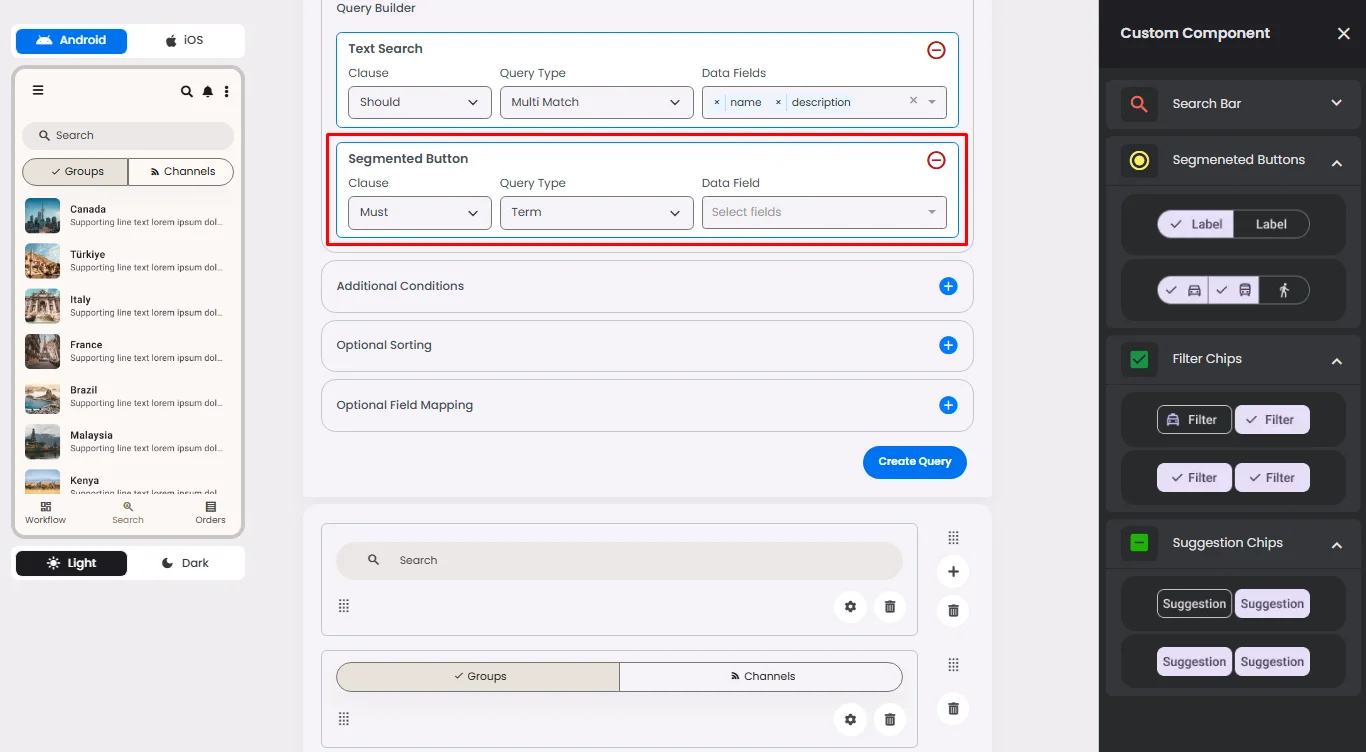
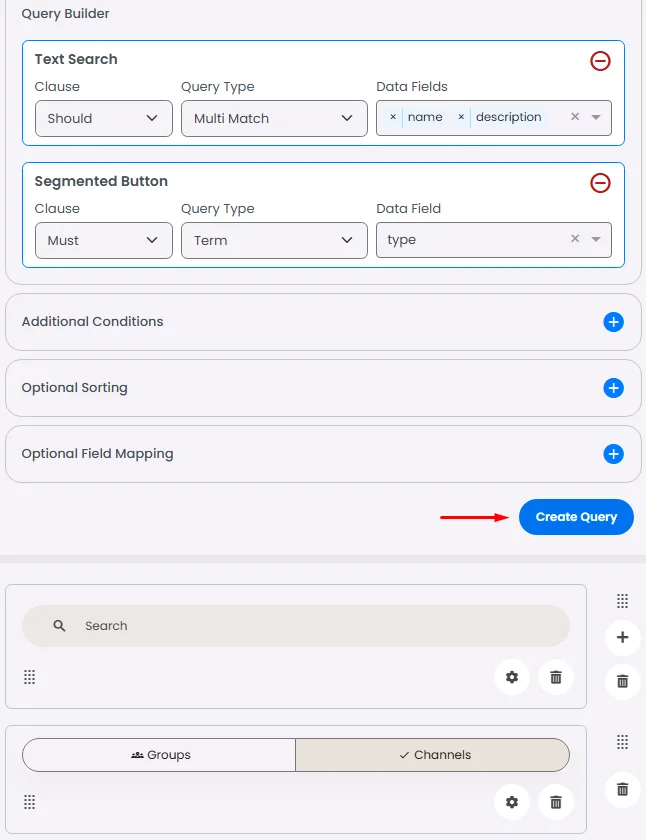
Clause
Based on the example, we will choose Must.
Query Type
The default is Term.
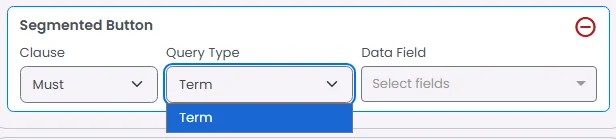
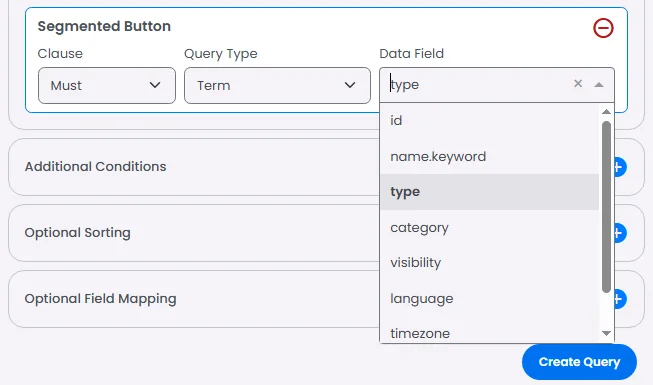
Data Field
Each data field has a certain value to use, even for testing:
Based on the example, we will choose the type.
Adding Value & Test
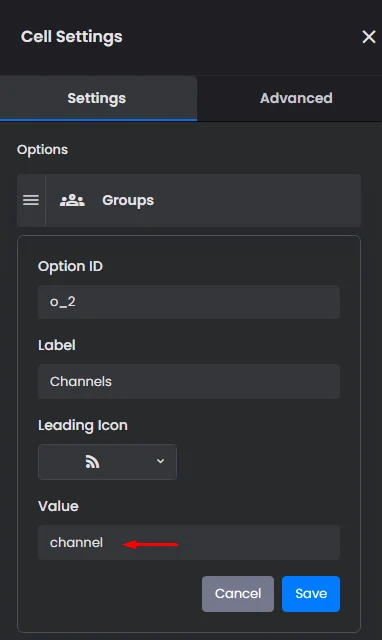
Click the gear icon of the segmented button.
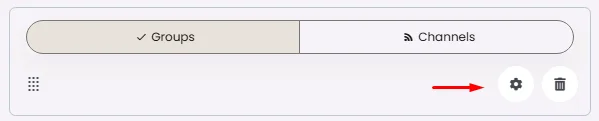
Go to your options, add the value ‘group’ to your Groups option, and add the value ‘channel’ to the Channels option.

Now we want to test the ‘Groups’ option.
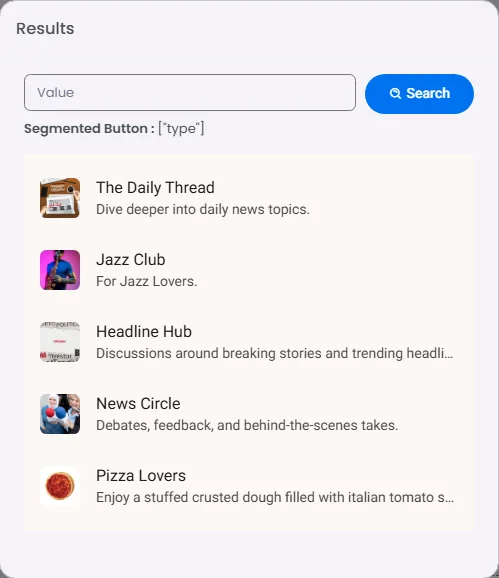
Go to the ‘Default Values’ and set the ‘Groups’ option as your default.
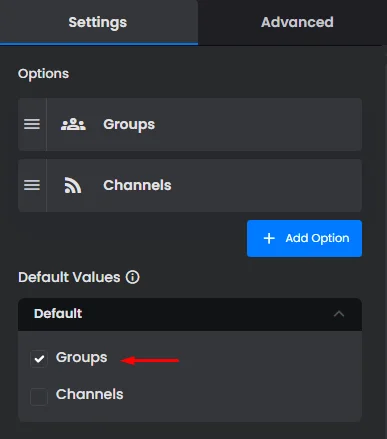
Click ‘Create Query.’
The result will display groups only.
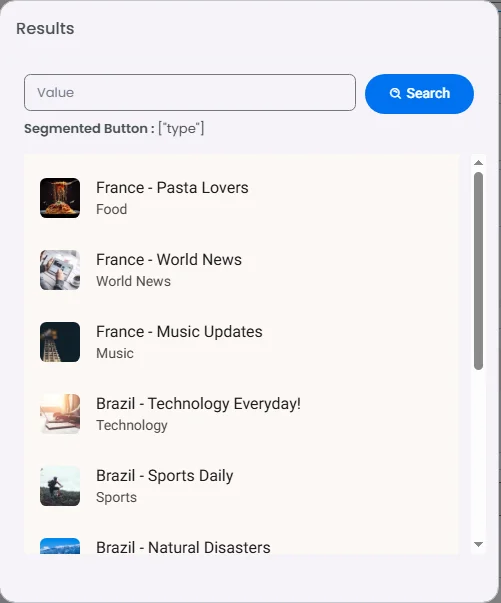
And the same goes for channels: make the ‘Channel’ option your default, click ‘Test Query,’ and the result will display channels only.
Just like the search bar, you can apply Additional Conditions, Optional Sorting, or Optional Field Mapping to the query builders of these elements. These features work as enhancements, offering more control over how filtered results are refined and displayed.
❓ FAQs
Q: How can I make the lists in my app searchable, so users can quickly find what they need?
A: In nandbox, you can build a searchable list that lets users look through channels, groups, products, events, or any other content in your app. Simply add a Search Bar to your list, and connect it with filters like segmented buttons or chips (filter chips, suggestion chips). These inputs help users narrow results instantly—for example, switching between Groups and Channels with a tap.
Q: What does the Data Source do in a Search List?
A: The Data Source tells the system what type of content your users can search. You can choose from:
- Community content → Channels, Groups, Users
- Commerce content → Products, Bookings, Events, Catalogs
- Media content → Images, Videos, Audio, Website URLs, Maps
Once you pick a source, the search will look through those items only.
Q: What are Clauses and why do they matter in search?
A: Clauses tell the search engine how to treat your conditions:
- Must → Only include items that match.
- Should → Prefer items that match, but still show others.
- Filter → Apply an exact rule (like date or category) without changing ranking.
- Must Not → Exclude items that match.
For example, if you want to show only News channels, you’d use Must.
Q: What’s the difference between Match and Multi-Match search?
A: It’s about how many fields the search looks at:
- Match → Searches a single field (like just the name).
- Multi-Match → Searches across several fields (like both name and description).
So if a user types “News” and you want to catch both channel names and their descriptions, you’d use Multi-Match.
Q: What are Data Fields in search and how do I choose them?
A: A Data Field is the specific piece of information the search looks at. For example:
- Basic fields → name, description, created date.
- Commerce fields → vendor, price, compareAtPrice.
The available fields depend on the data source you chose.
Q: Can I add filters that always apply, no matter what users type in the search bar?
A: Yes. That’s what Additional Conditions are for. They let you enforce rules that stay active even if the user doesn’t enter them. For example, you might only want to show channels from a specific category, or products under a certain tag. These rules keep your search results consistent.
Q: Can I sort the search results in my app?
A: Definitely. Sorting is optional, but it gives you control over how results appear. Just pick a Data Field (like name.keyword or created_date) and choose ascending (A–Z, oldest first) or descending (Z–A, newest first). For instance, you could show news channels alphabetically or list events starting with the most recent.
Q: How does Field Mapping work in a Search List?
A: Field Mapping lets you control what shows up in key positions of your search results. Instead of sticking with the default, you can swap in something else. For example, instead of showing the channel name as the headline, you might choose to display the description instead. This way, your search results look exactly how you want them to.
Q: Can I customize field mapping for more than one data source?
A: Yes. If your list combines multiple sources (like Groups and Channels), you can map each one separately. You can either:
- Use Fields → Choose from existing values.
- Use Constant → Enter your own text (like showing “New” instead of a headline).
This ensures each type of content is displayed in the way that makes the most sense for your app.
Q: What are filter elements like chips and buttons, and how do they improve search?
A: Filter elements like segmented buttons, filter chips, or suggestion chips give your users quick, one-tap ways to refine search results. For example, you could add a segmented button with two options: Groups and Channels. Tapping “Groups” would instantly filter results to only groups, while “Channels” shows just channels.
You can even test and set default values—for example, making “Groups” the default filter when the search opens. These controls make the search feel smooth and user-friendly.